
We have been so busy working that we have been forced to split this latest update into two parts!
This is Part One.
We were recently contacted by Stephanie Petrey, granddaughter of SSGT John F. Schimenek. A wonderful surprise!
Schimenek flew as the left waist gunner on Lucky Thirteen during Operation JUGGLER – the 17 August 1943 strike against Schweinfurt. This was the bomber’s third combat mission.
He is also the airman responsible for the famous photo of a falling B-17 over Schweinfurt. Said photo is featured on the front page of our website.
A 20mm autocannon shell exploded in the waist compartment that day, wounding Schimenek and right waist gunner SSGT L. Corwin Miller. Miller’s lung was punctured but he held his position until a break in fighter attacks allowed radio operator TSGT Francis Gerow to administer first aid. Miller was awarded the Silver Star and Purple Heart for his actions, but Schimenek did not receive his Purple Heart until 1993 when comrades petitioned on his behalf.
Schimenek passed away in 2007 at the age of 90 in Superior, Wisconsin.
Stephanie, thank you for your kind words, and thank you for your grandfather’s service. I am sure he would be proud knowing that you remember the sacrifices made by him and his brothers-in-arms. We hope that rebuilding Lucky Thirteen will bring honor to these brave men.
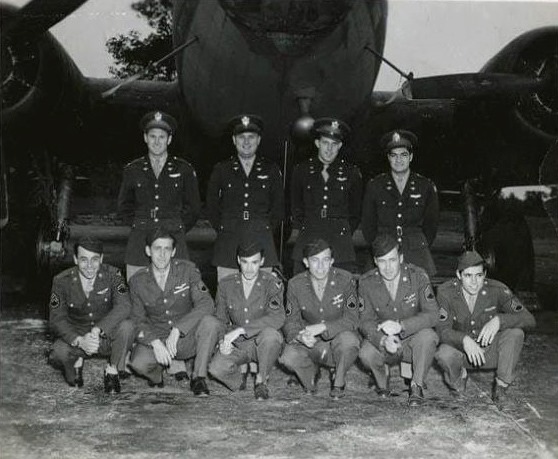
Schimenek was part of the 546BS’s “model crew” – the first combat crew assigned to the squadron.
Here they are posing in front of Doris Mae (42-3218, 384BG).
Back Row (left to right):
CPT James C. McClanahan (Bombardier)
CPT Phillip M. Algar (Pilot)
1LT Richard V. Wolf (Pilot)
CPT Frank A. Celentano (Navigator)
Front Row (left to right)
SSGT John F. Schimenek (Gunner)
SSGT Casmer R. Majewski (Gunner)
SSGT Roland B. Laviolette (Engineer)
SSGT L. Corwin Miller (Gunner)
TSGT Francis Gerow (Radio Operator)
SSGT Kenneth M. McKay, Jr. (Gunner)
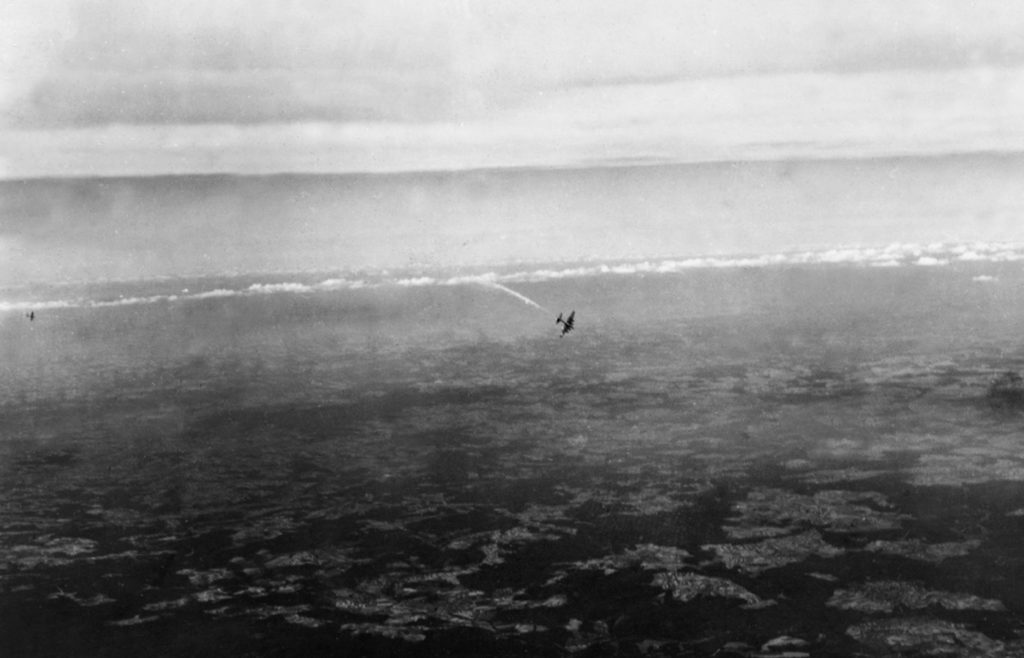
One of the iconic images of the air war over Europe – a unidentified B-17F is shot down during Operation JUGGLER.
The fighter that claimed it is visible nearby.
This photo was taken by Schimenek from the left waist position on Lucky Thirteen.
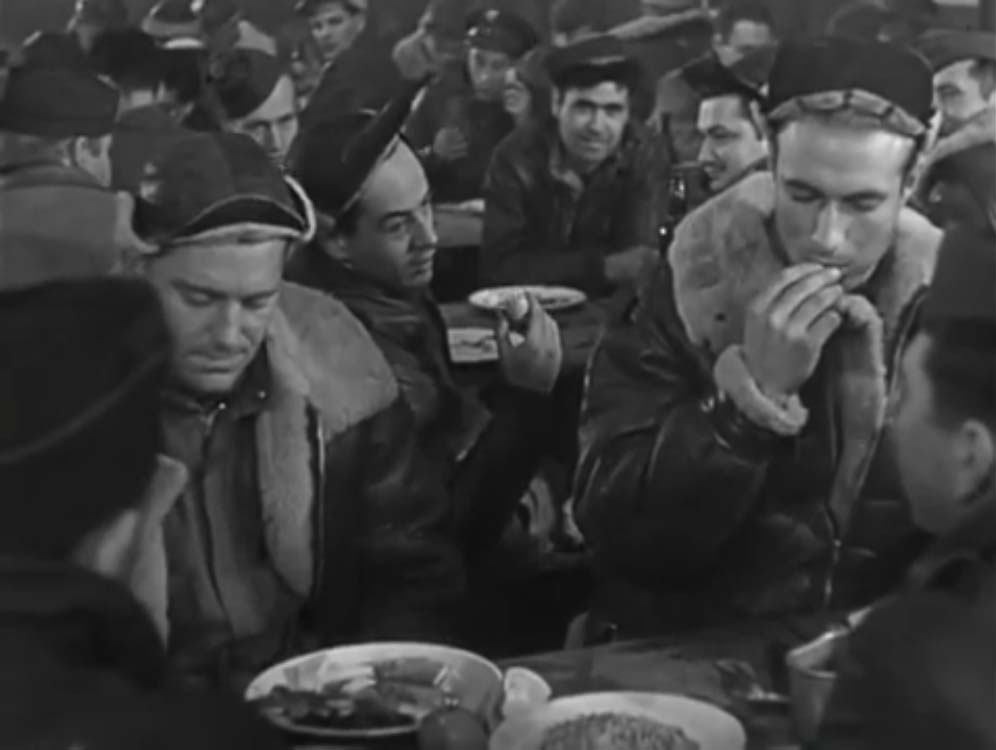
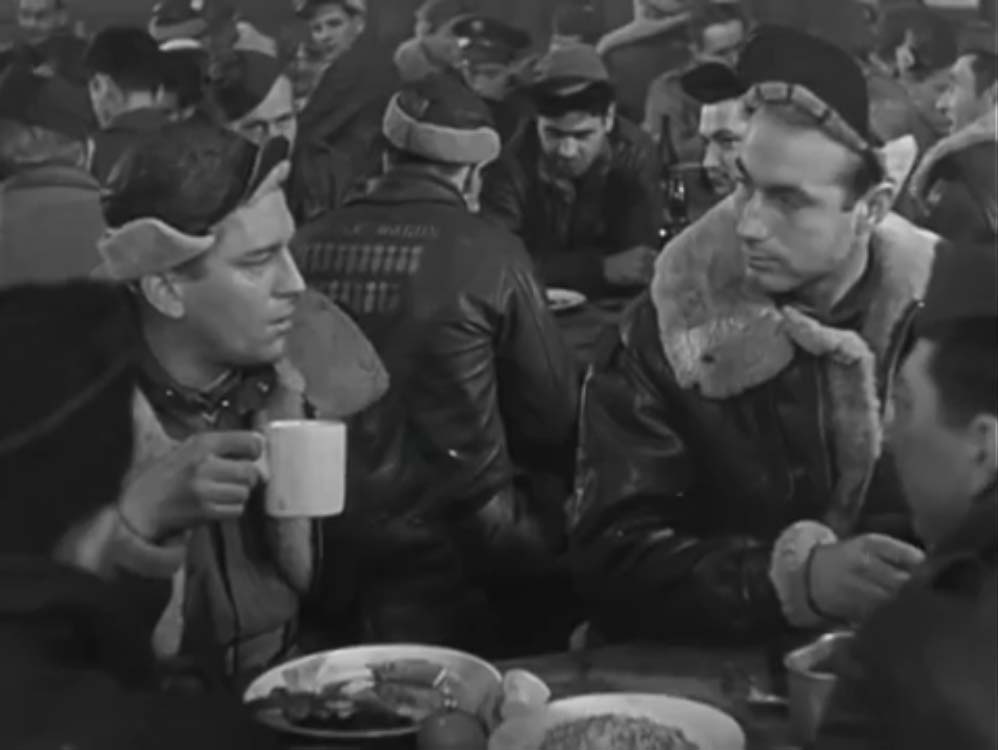
Schimenek appears in the documentary Target For Today roughly around the 29:40 minute mark.
Schimenek is in the center, eating an orange. His lines, and those of his comrades, are obviously scripted, but seeing real 384BG airmen in their daily routine is still incredible. Note his A-2 jacket, which is painted to represent Battle Wagon (42-30026).
Target for Today was an attempt by the Army to break down the operations of a typical US 8AF strike. The film follows the planning and execution of the 9 October 1943 bombing of Anklam, Malbork, and Gdansk, Germany and Gdynia, Poland.
US records show 28 bombers lost out of the 378 launched. German records confirm the loss of 15 interceptors.
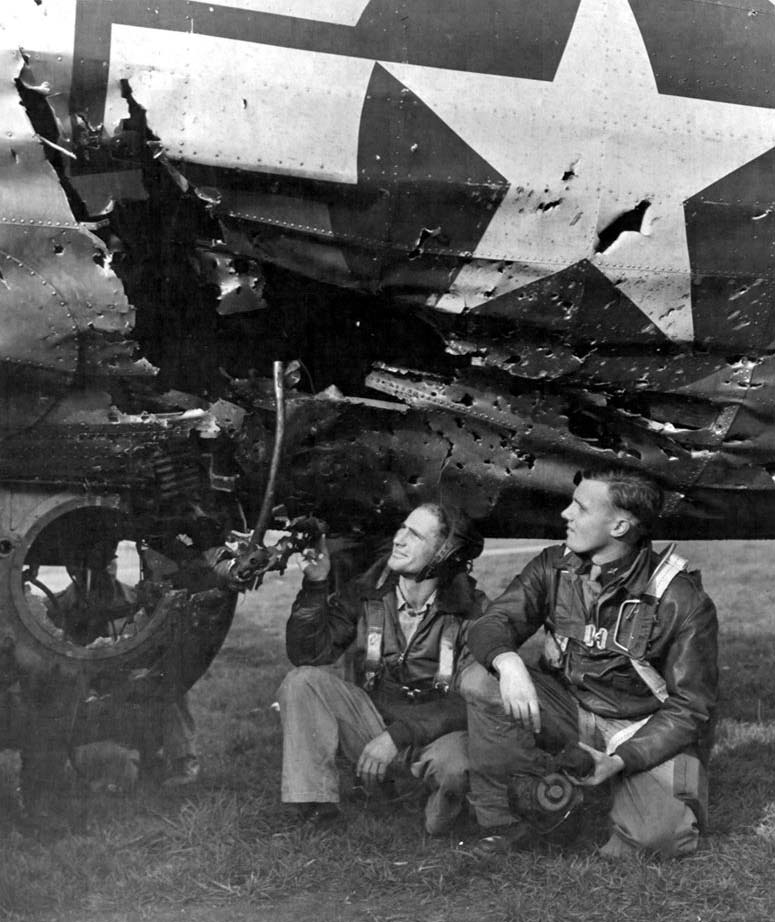
One of the more extreme examples:
1LT Paul R. McDowell and TSGT James Hobbs examine damage to the waist section of Little Miss Mischief (42-97880, 91BG) on 15 October 1944.
While the damage is more extensive than that suffered by Lucky Thirteen, the situation was similar – a cannon shell penetrating and exploding in the waist. In this case, however, the explosion was closer to the ball turret. SSGTs Ed Abdo (ball) and Glenn Slaughter (waist) were wounded but no-one was killed.

Ray’s uncle, MSGT Marvin Hudson (wearing sunglasses), supervises repairs to Lucky Thirteen.
This is the only photo of Lucky Thirteen that we have yet located. While the aircraft in the photo has not been positively identified, based on the evidence, we believe this is her.
Karl Whitchurch of Mt. Angel, Oregon donated a MC-124 tuning cable for the SCR-269 Radio Compass System. This is a big step. The only thing keeping us from setting up the radio compass now is the flange for the football.
The blueprints call for tuning cables in lengths of 20, 23, and 97 inches, all connected to a T on the wall beside the navigator. Two of these cables run to the BC-434 control boxes (one beside the navigator, one above the pilots) and one cable runs to the football.
I went ahead and gave the cable a good cleaning – turned out nicely.
Next, since the governor had everyone on lockdown, we had plenty of time to do work around the woodshop. Alongside building a glider swing and a wood storage cart, we put together another radio display shelf. This shelf is for the SCR-595 IFF system, which was donated by our friend Jack Antonio some time ago. Jack’s donation included testing units so that we can demonstrate the IFF in operation when people visit the hangar.
I also built a new display shelf for the intercom system, as the original one was a bit too small.
Lastly, our friend Bob Hachmann is looking to fabricate the little metal bits which go on the ammo boxes. If you can be of some help here, why not do so now, when everyone is stuck at home? Alongside the pieces mentioned last week, the biggest need in regard to the boxes are ammunition chutes and chute adapters – the latter in particular. Lucky Thirteen carried eight chutes:
2x 48 inch, Left-Hand Feed
4x 48 inch, Right-Hand Feed
1x 65 inch, Left-Hand Feed
1x 65 inch, Right-Hand Feed
It would also be nice to have at least one chute adapter around to ensure the feed system will flow smoothly. If we ever get the opportunity to hook our boxes up to a live fire demonstration, we want them to work!
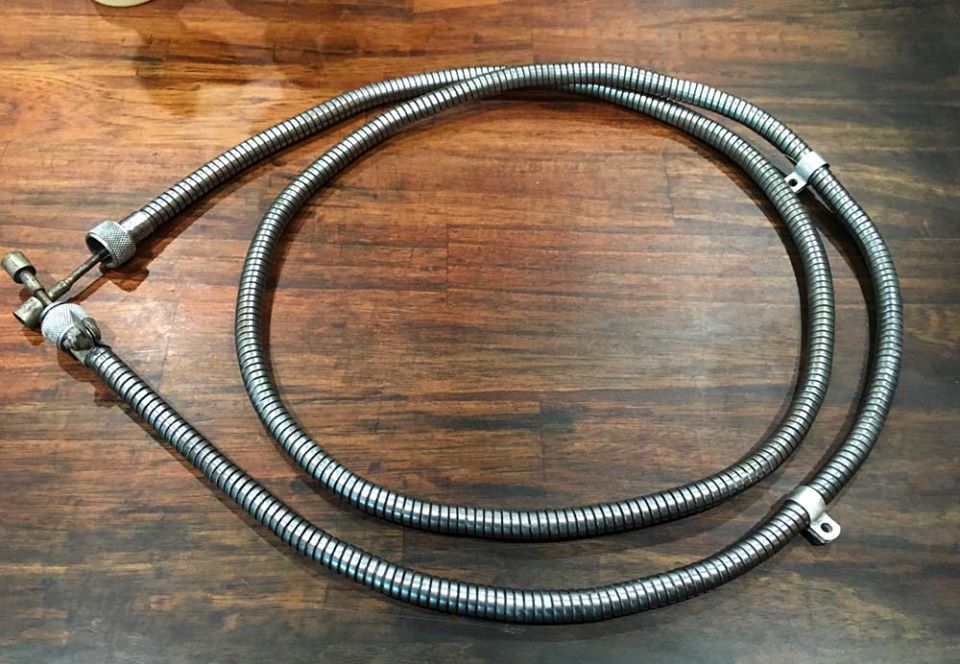
The newly-donated MC-124 cable is cleaned.
Photo taken 11 April 2020.
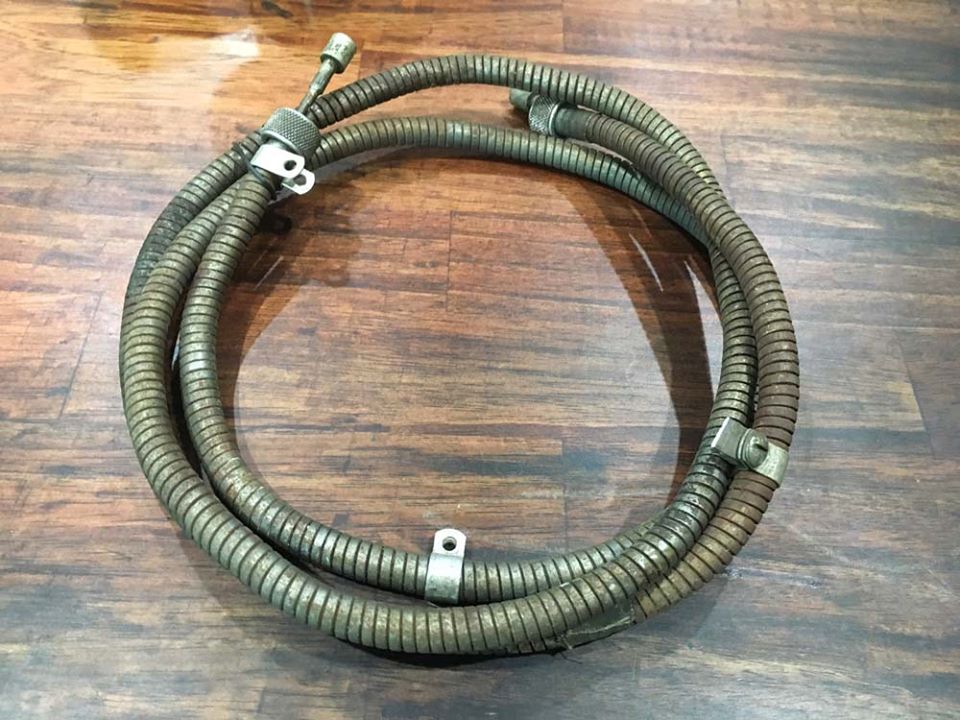
Karl Whitchurch’s newly donated MC-124 cable.
Photo taken 11 April 2020.
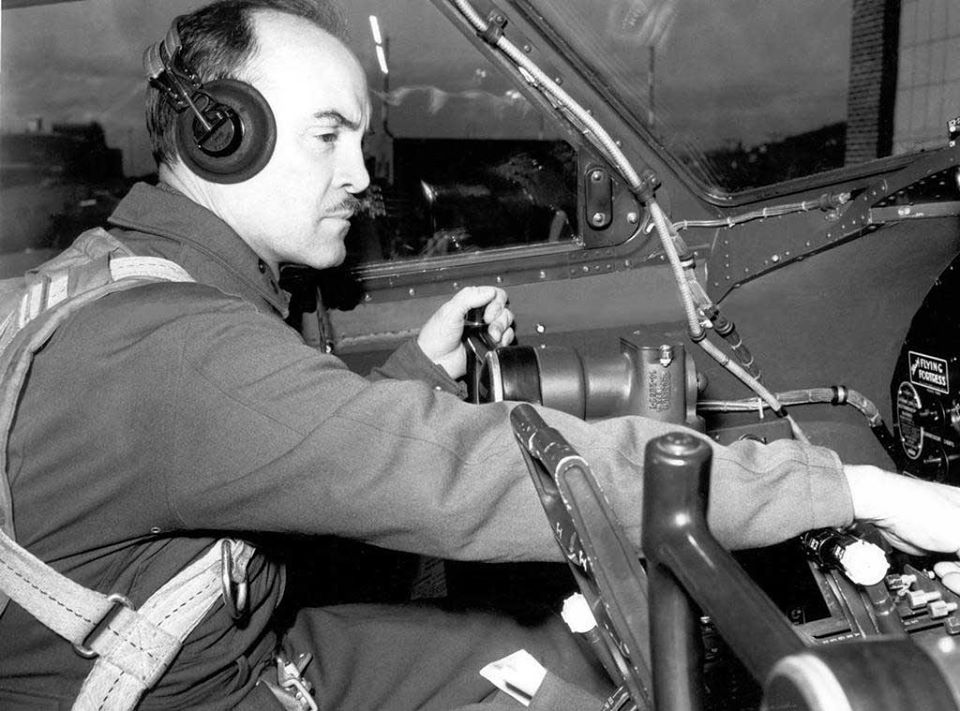
Test pilot Eddie Allen at the controls of a B-17. Note the MC-124 cable going up the window beside him.
A manual photo from a G-model B-17 shows the T for the SCR-269 on the wall beside the navigator’s desk. The left side of the T is running to the BC-434 control box on the wall above.
On the F model, this area is obscured by the equipment seen on the shelve above the desk (which was mounted against the wall). The big black box on this shelf is the AN5753 Amplifier for the Gyro Fluxgate Compass. The AN5753 is the only part we have yet to locate for this system.
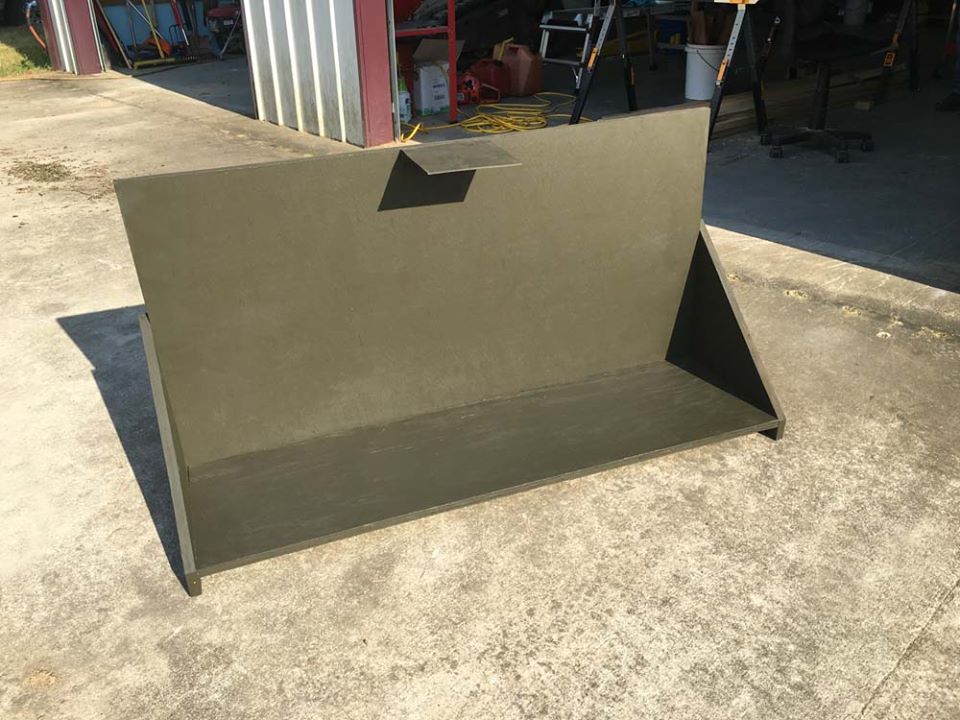
The newly-finished display shelf for the SCR-595 IFF system.
Photo taken 7 April 2020.
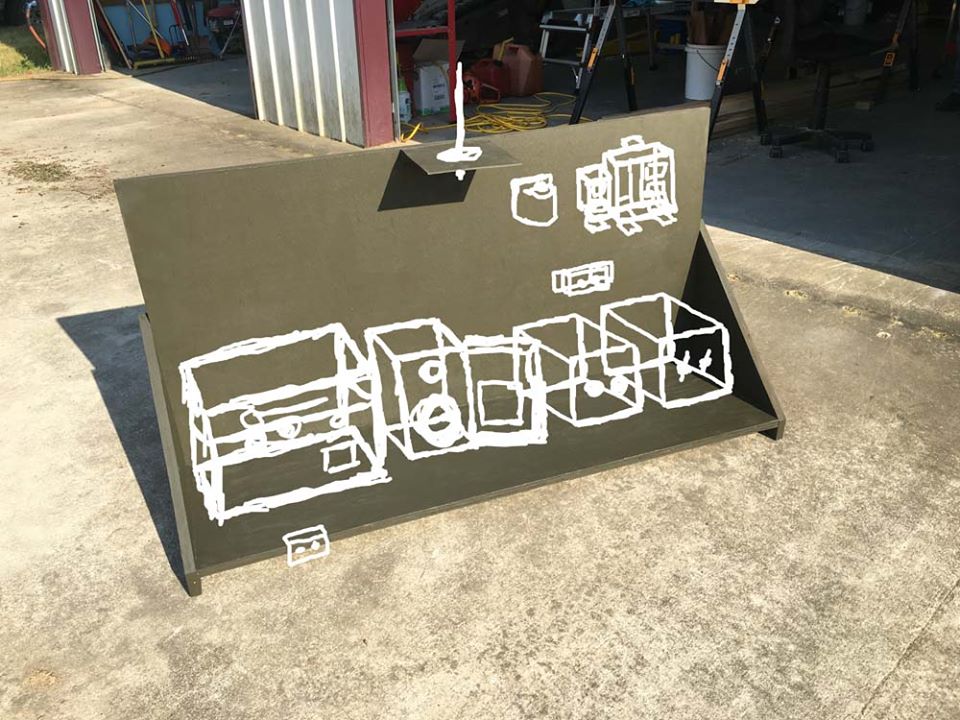
The components that will be put on display are crudely drawn on the picture of the SCR-595 display shelf.
Photo taken 7 April 2020.
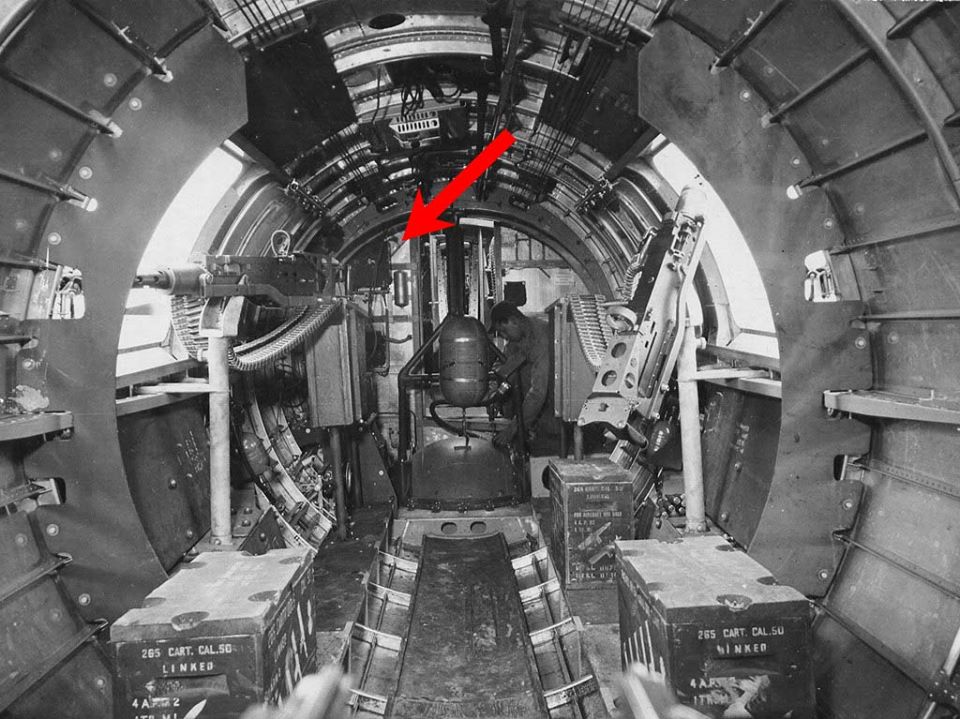
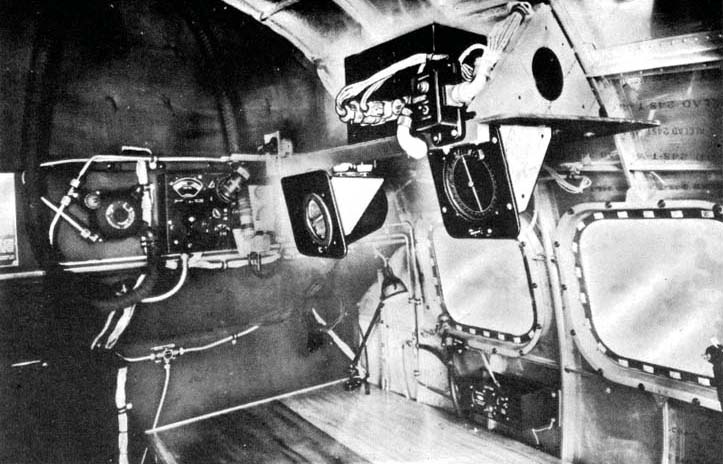
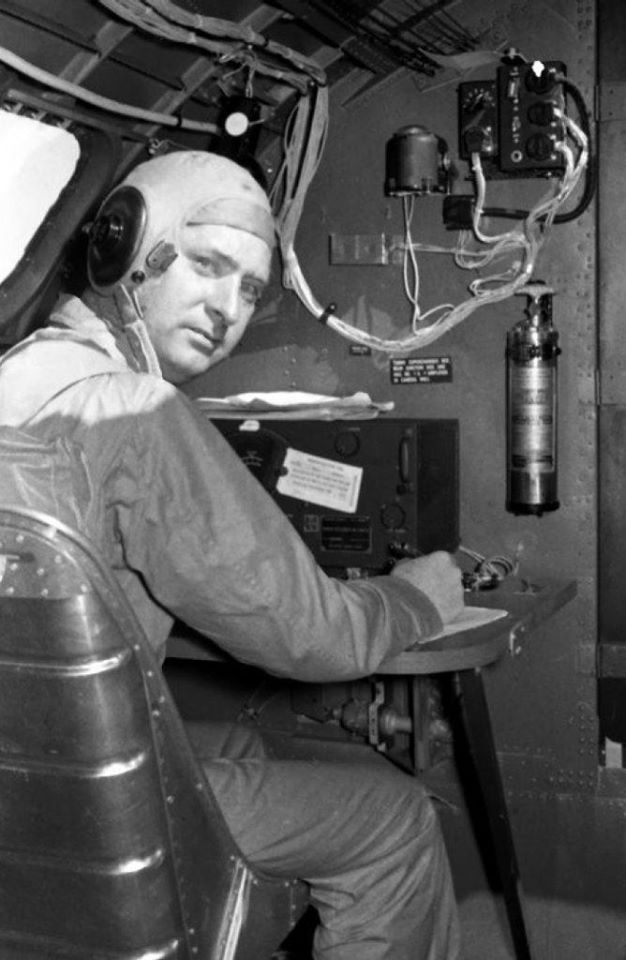
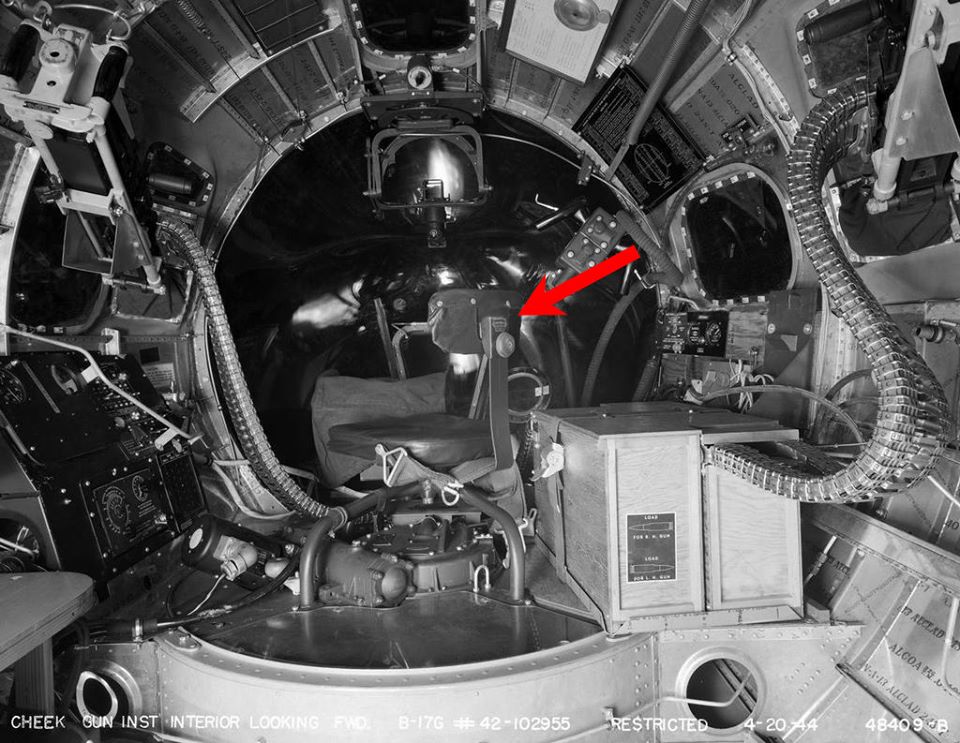
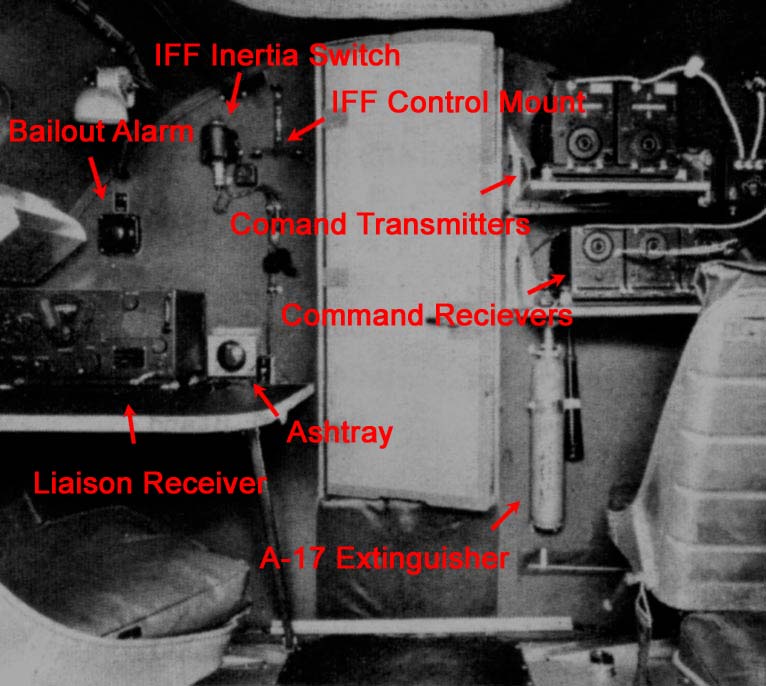
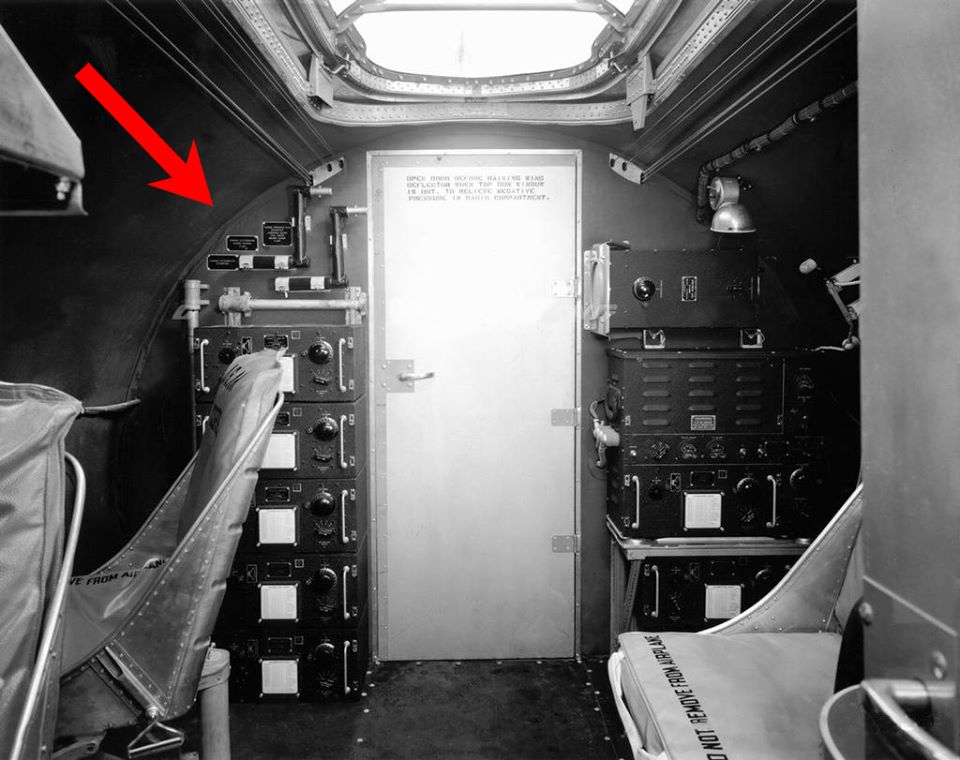
The IFF transponder is highlighted in this picture of a B-17F waist compartment.
Barely visible in the photo are the BC-727 indicator lights, which clip to the shelf holding the transponder.
The BC-958 Control Box and BC-965 Selector Box, alongside the BC-706 Inertial Switch, are mounted on the wall above the radio operator’s desk.
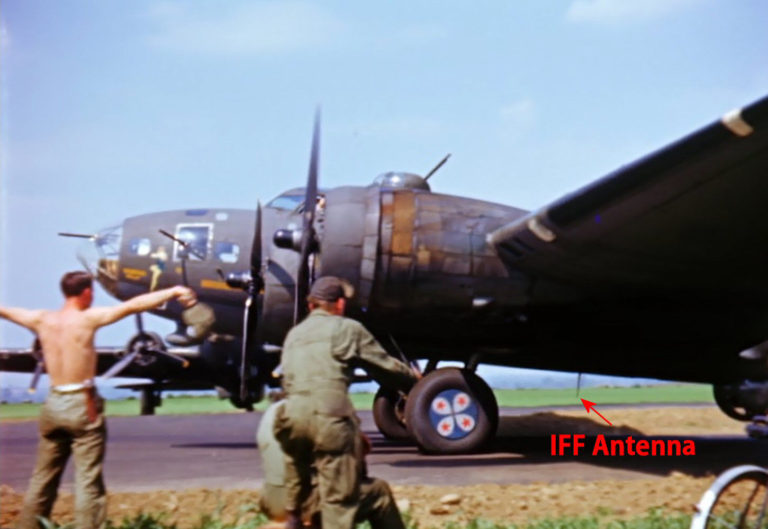
The AN-95 antenna for the IFF system is highlighted in this screencap from the Memphis Belle documentary.
The BC-765 manual self-destruct for the IFF was mounted in the cockpit.
Even when things seem rough, good things happen.
We got a package from our friends from MoBat – it’s the rollers for the ammunition boxes on Lucky Thirteen.
The blueprints called for the rollers to be made from phenolic tube with stamped aluminum end caps. Dominic Pike over in the UK was gracious enough to offer his help in tooling these cap pieces, but finding the phenolic proved ludicrously expensive. While twenty-to-thirty bucks a foot does not sound so bad, requiring a minimum order of 21 feet is ridiculous (particularly when we are not working in feet but inches). Thankfully, the blueprints included a provision for when phenolic was unavailable, specifying wooden rollers made from large diameter wooden dowels.
These dowels were made similarly to the metal and resin rollers used in fighter aircraft. Rather than a 2″ or 3″ tube, the dowel-type rollers were made by coupling a portion of the needed diameter to the ends of a 1″ diameter center spar. Since dowels are rarely sold commercially above 1-1/2″, this was going to require some skill with a lathe. Luckily, we got help from one of the best lathe guys in the business: MoBat – a custom baseball bat manufacturer from Bernie, Missouri – generously offered to recreate the B-17’s ammunition rollers.
MoBat is run by David and Garrett Keathley (who are awesome people) and the rollers were handspun by Mr. Roy Gibson. I have to tell you: lathing is a difficult art form and, seeing these in person, Roy is an absolute master.
We cannot thank MoBat, the Keathleys, and Roy enough for this contribution. The quality of these rollers is outstanding. You can check out their eBay store here.
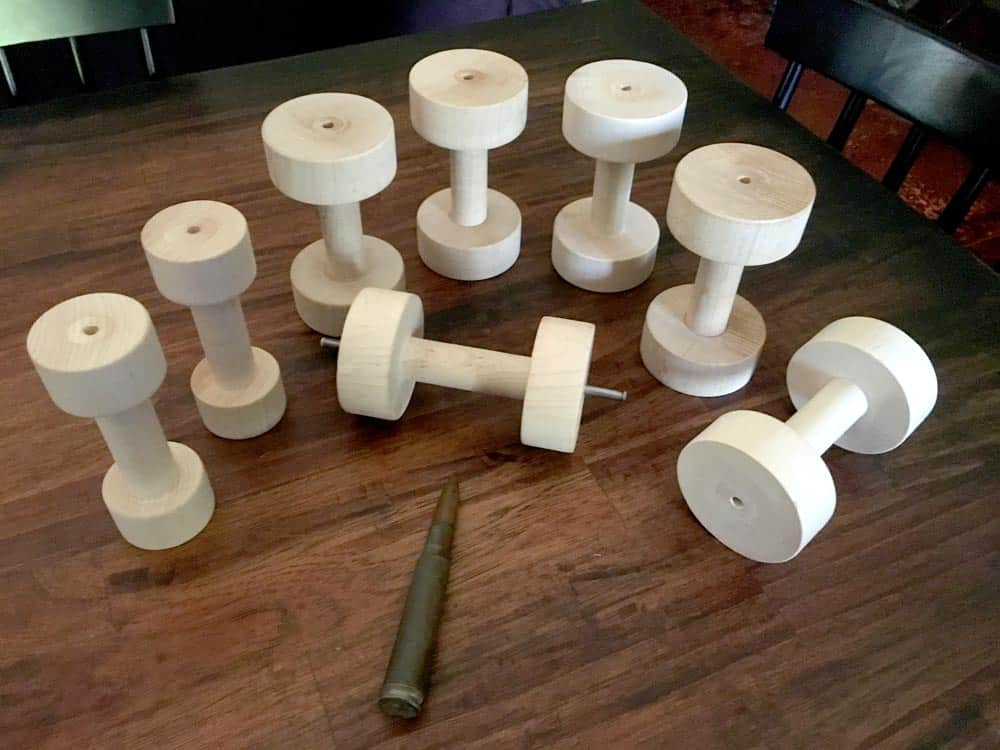
The newly-arrived ammunition rollers.
We have already cut and chamfered the rods for these, with the roller in the center showing how the rods fit.
The two small rollers on the left are for the nose gun and radio hatch guns (we recently discovered we need another pair of these). The others are for the waist and and tail gun boxes. Since the tail gun boxes feed from the floor, each box has a pair of rollers rather than just one.
Photo taken 3 April 2020.
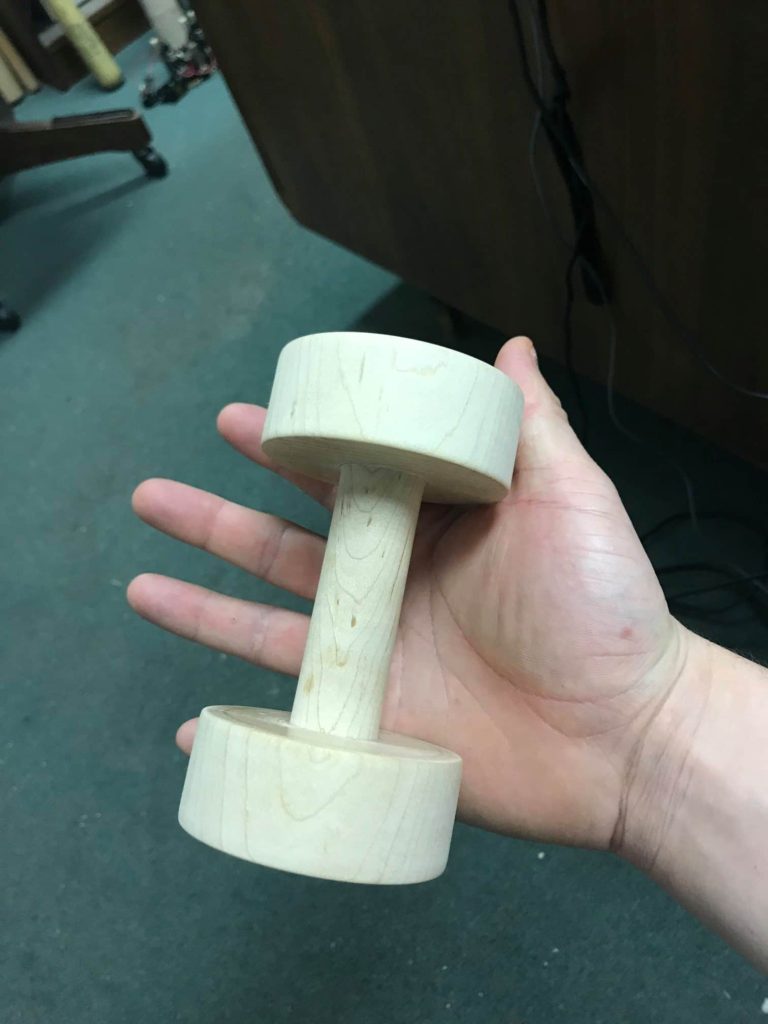
David Keathley shows us the first of his ammunition rollers for Lucky Thirteen. A perfect job.
This particular roller is one of the 3″ models used in the waist and tail compartments.
Photo taken 16 March 2020.
A blueprint is highlighted to show one of the rollers in place.
This axe comes to us via Kenneth Pendley of Midwest City, Oklahoma and will be installed on the back of the co-pilot’s seat.
Crash axe 42D8331 was produced by a variety of manufacturers and is actually still in production via Gemtor of Matawan, New Jersey. Fifteen inches long and just under three pounds, this sturdy little axe is insulated for up to 20,000 volts.
The crash axe was kept in the cockpit, being placed on the wall to the left of the pilot until 42-30432. At this point, the axe was moved to the back of the co-pilot’s seat beside the elusive paper 39D3339 cup dispenser. The axe is intended to allow the engineer and pilots a means to escape the ever-so-cramped cockpit in an emergency. In the event of a ditching or fire, a jammed window can mean the difference between life or death.
The Auxiliary Parts Drive is progressing quite well. Thus far, the most elusive auxiliary parts for Lucky Thirteen are the 39D3339 Paper Cup Dispenser, CC-4202 Sierra Chemical Toilet (or M-1019 Imperial Brass Toilet), and Type A-2 Flare Gun Wrap (43G7044). The largest auxiliary pieces still not located are the K-24 Strike Camera and Type C-10 (HRU-28) Auxiliary Power Generator.
Photo taken 29 February 2020.
A drawing I created showing all of the equipment which hangs on the back of the pilot seats. Please note that this drawing is specific to our serial number and does not apply to all B-17s.
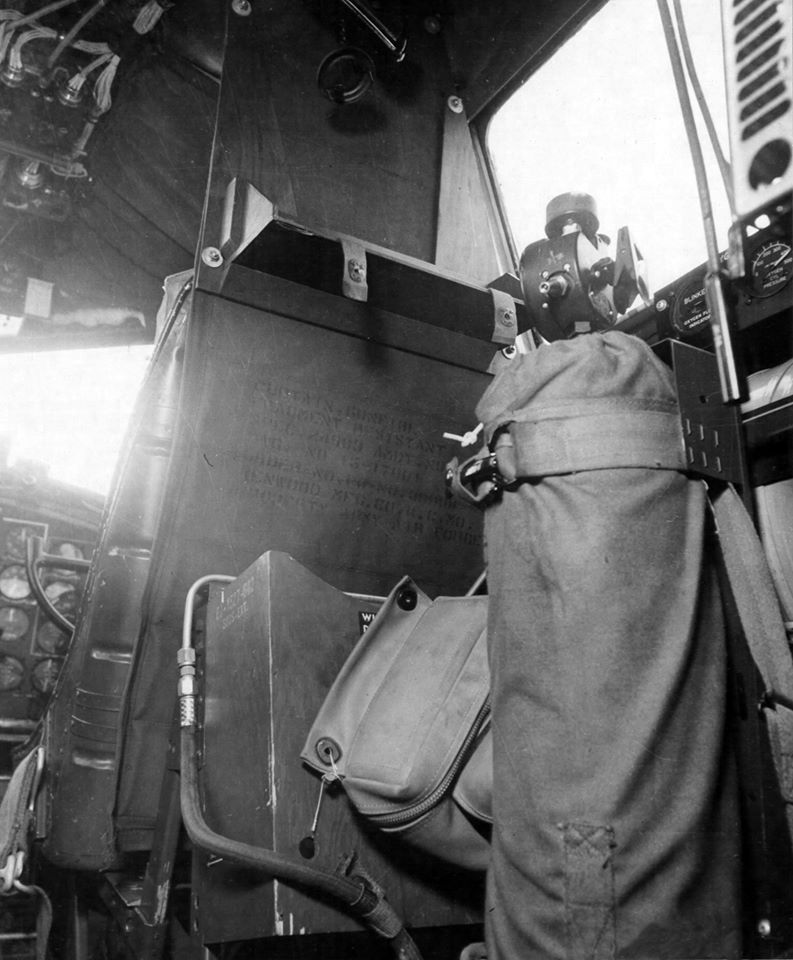
The C-3 Signal Lamp donated by Keith Ellefson is the black box on the back of the pilot’s seat, and the A-7 Flare Container is visible above. The Wiring Diagram Box, with one of the Aeronautic First Aid Kits, is attached to the back of the co-pilot’s seat, with the Crash Axe visible below.
What remains is the Type A-2 Flare Gun Wrap (43G7044), the Paper Cup Dispenser (39D3339), the B-17 Familiarization Manual, and five 1936 Ford Ashtrays. The three portable oxygen brackets have already been replicated, though we do not have Type A-4 walkaround bottles for them.
Roger the Lodger II (42-30377, 95BG) burns over the English Channel on 9 October 1943.
The speed at which a fire can spread on an aircraft is shocking. Seven of the ten-man crew aboard Roger the Lodger II managed to escape but not before two of their parachutes caught fire. The three who didn’t get out were those in the cockpit.
In the end, there were no survivors from Roger the Lodger II.
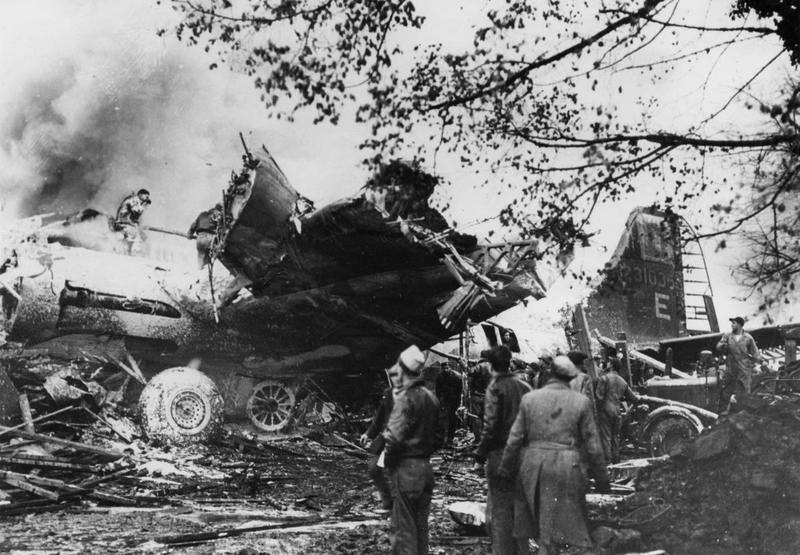
Hang the Expense (42-31035, 100BG) burns after veering off the runway and colliding with buildings of Lodge Farm near Dickleburgh on 26 November 1943.
The pilots and navigator had attempted to take the bomber on a pleasure flight with a pair of Red Cross nurses and were each fined $100 for their indiscretion. Despite a total loss of the airplane, nobody was hurt.
A stock B-17 came equipped with four first aid kits: one being an aluminum can made by the E. D. Bullard Co. on Station 6 (behind the ball turret), and three canvas Aeronautic First Aid Kits made by the S. Froehlich Co. As such, each compartment had its own first aid supply.
Research by Karl Hauffe revealed that the most common wartime aeronautic first aid kits were the so-called “First Pattern” types. These are somewhat difficult to find in good condition, and since we needed a fair number of them, we went in with the National Museum of the US Air Forceto have replicas made for Memphis Belle and Lucky Thirteen. Later, the Douglas C-47 Night Fright joined this project. (We encourage everyone to follow their very impressive work.)
We located an original and sent it to Joshua DeJong of The Rigger Depot for recreation. Joshua’s work is superb, going so far as to purchase a few originals of his own to track down variations in wartime production.
These kits originally contained:
-Adhesive Compress (Box of 16)
-Burn Ointment (Box of 2)
-Eye Dressing Set
-Halazone Tablets (Box of 100)
-Iodine Swabs (Box of 10)
-Morphine Syrettes x2
-Scissors (4”)
-Small Wound Dressing x3
-Sulfa Envelope
-Sulfa Tablets (Box of 8)
-Tourniquet
Refills for these kits can be purchased at WWII Soldier if anyone wants to fill out the kits on Lucky Thirteen….
Also included in this update is my latest wood project: the Wiring Diagram Box. Part no. 67-1527, this box mounted on the back of the co-pilot’s seat. The box held attachments for the cockpit’s first aid kit and LORENZ blind-landing equipment (which was not installed on Lucky Thirteen). With this piece complete, the only auxiliary pieces left for the pilot seats are three Type A-4 walkaround oxygen bottles, a Familiarization Manual, a Type A-2 flare wrap (43G7044), and the elusive paper cup dispenser (39D3339).
I tracked down the issue of Yank magazine that was in print the week Lucky Thirteen was shot down, hoping to stuff it in the box as a surprise for Ray. It was too big to fit, but he still flipped when he saw it.
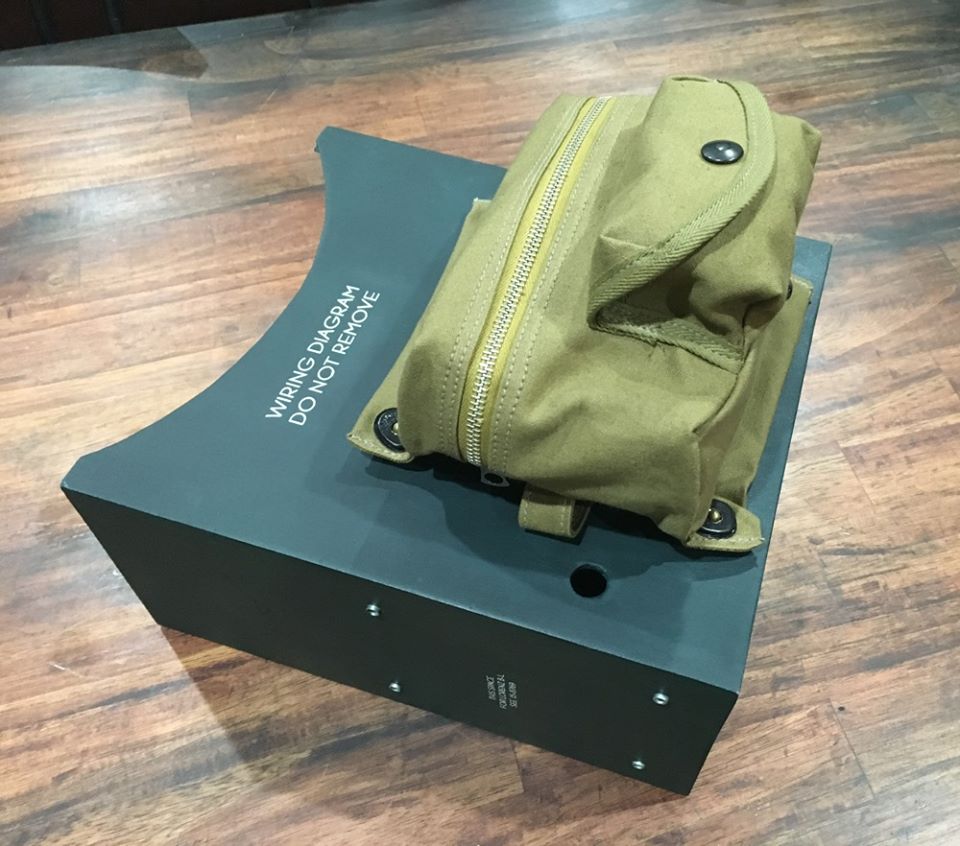
One of Joshua DeJong’s newly-completed Aeronautic First Aid Kits attached to the newly-finished Wiring Diagram Box.
Photo taken 29 February 2020.
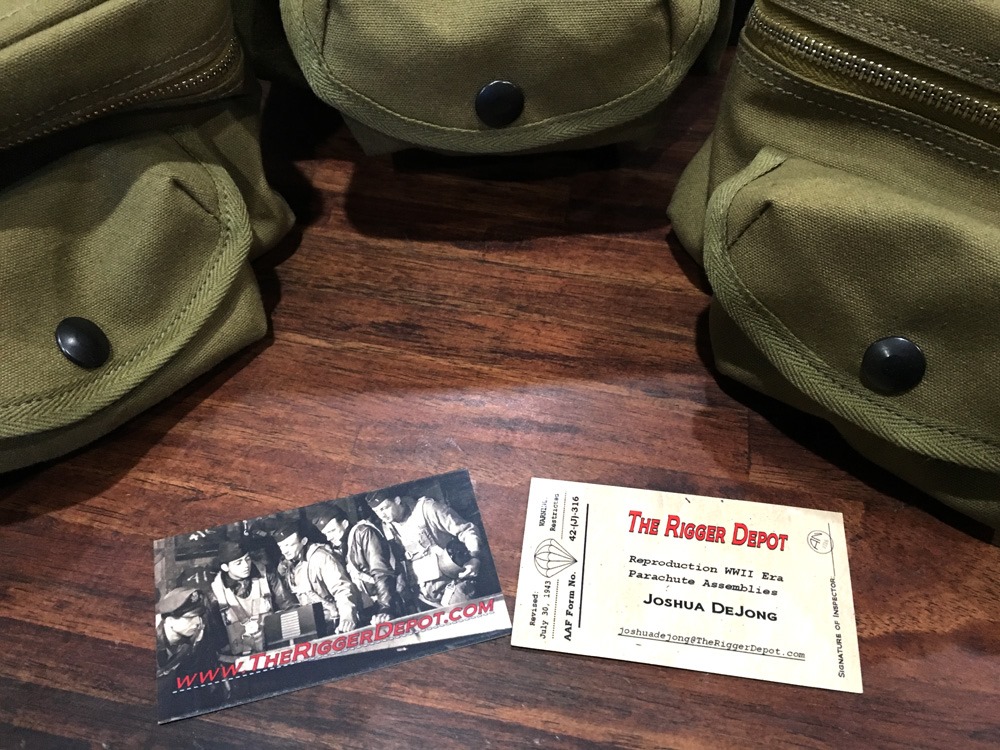
Joshua DeJong business cards are flanked by the three Aeronautic First Aid Kits he made for Lucky Thirteen.
Joshua is as obsessed with accuracy as we are and we cannot stress enough how much we recommend his work.
Photo taken 29 February 2020.
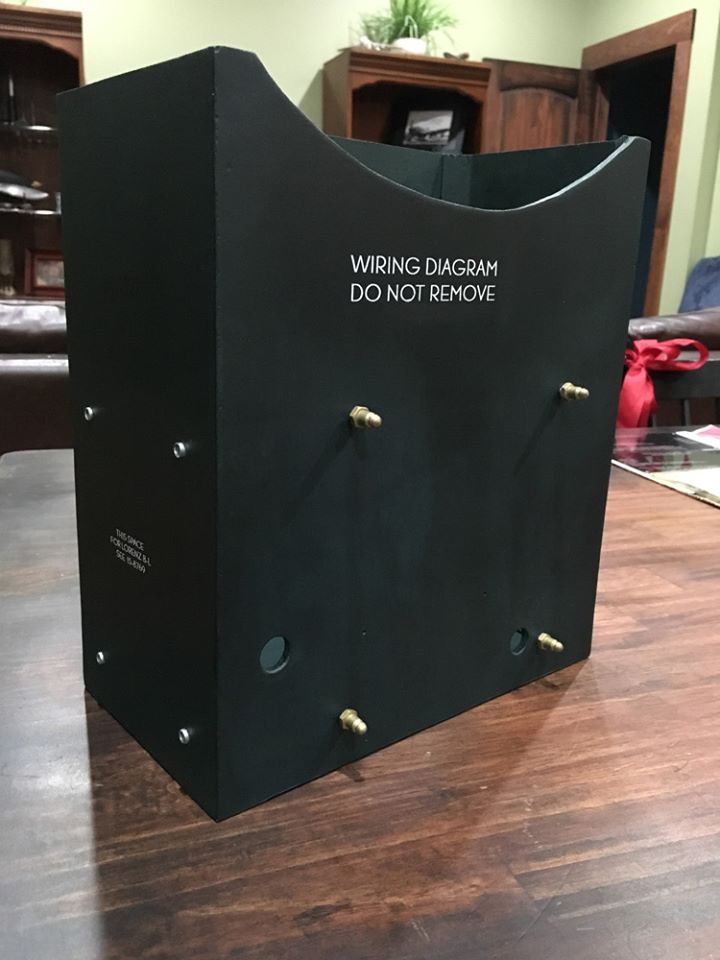
The newly-completed Wiring Diagram Box for Lucky Thirteen. Like all of the carpentry work on the B-17, it was far more complex than it at first appeared. Still, it was an enjoyable experience and I am proud to say that it matches the blueprints down to the smallest detail.
Photo taken 1 January 2020.
The Aeronautic First Aid Kit and Wiring Diagram Box aboard a late G-model. Note the giant D-2 walkaround bottle, commonly found on late-war aircraft.
The seat armor on this aircraft has been removed and replaced with a flak curtain – similar to a flak jacket in construction. Note how the flare shelf and oxygen recharge line has been moved to the co-pilot’s side, with the hose being held in place using one of the pins meant for the First Aid Kit.
Thanks to Karl Hauffe for tracking this photo down.
Photo taken 24 September 1945.

Airmen of the 306BG in a B-17G cockpit.
While the armor seat plates have been removed, the seat on the pilot’s side is stock according to the blueprints. Note the flare shelf, walkaround recharging hose, and Aldis Lamp storage.
The Wiring Diagram Box and First Aid Kit are barely visible on the back of the co-pilot’s seat. What is unique is the plywood attachment above. It seems that the flare container has been done away with in favor of canvas hoops.
Thanks to Karl Hauffe for tracking this photo down
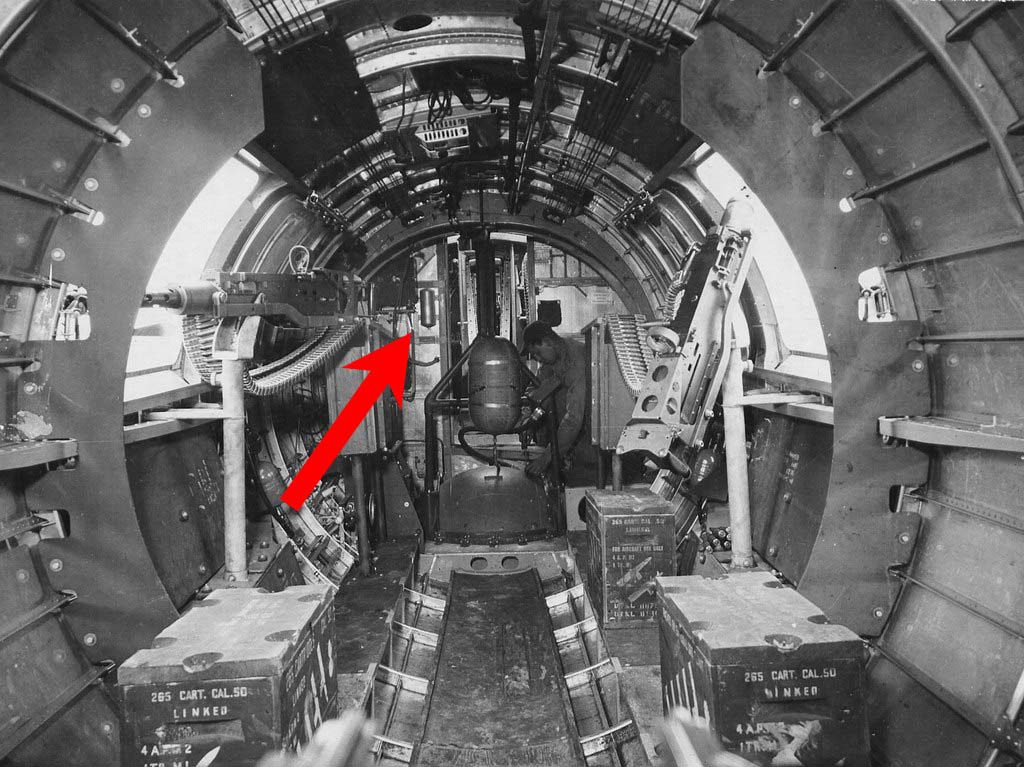
The E. D. Bullard First Aid Can is highlighted in this photo of a B-17F waist compartment.
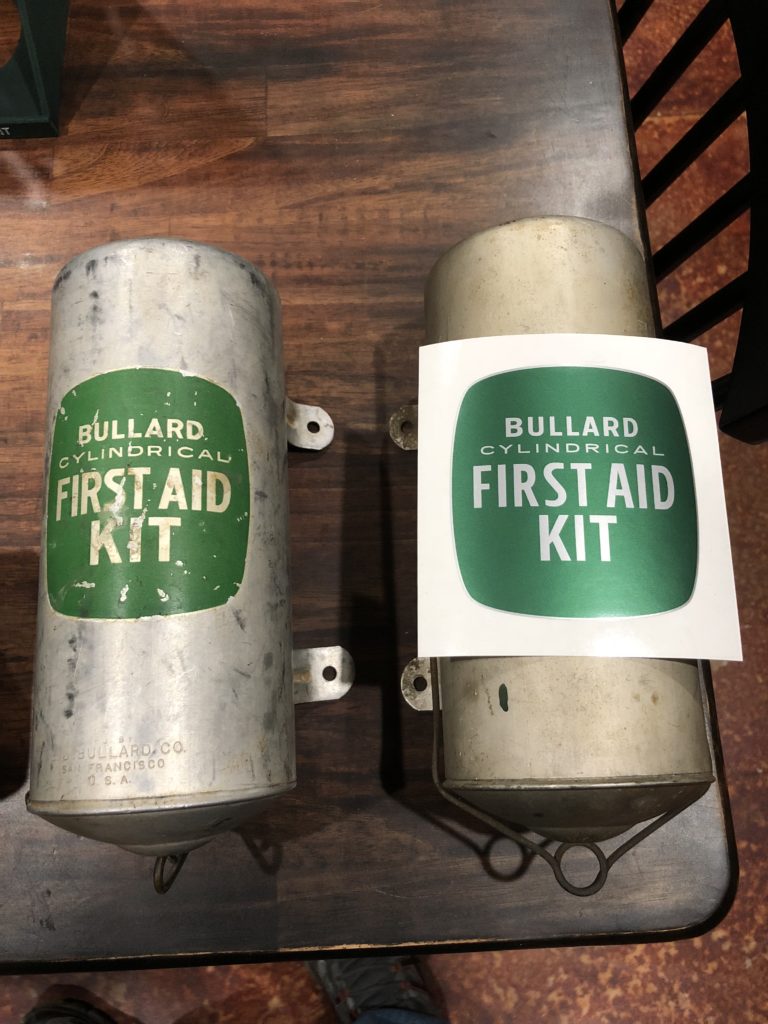
A pair of original E. D. Bullard First Aid Cans – the one on the left is from my private collection and the one on the right is the one that will be installed aboard Lucky Thirteen.
The recreated label is for Memphis Belle. I was asked to recreate the original Bullard labels for Memphis Belle and Swoose.
Photo taken 13 October 2018.
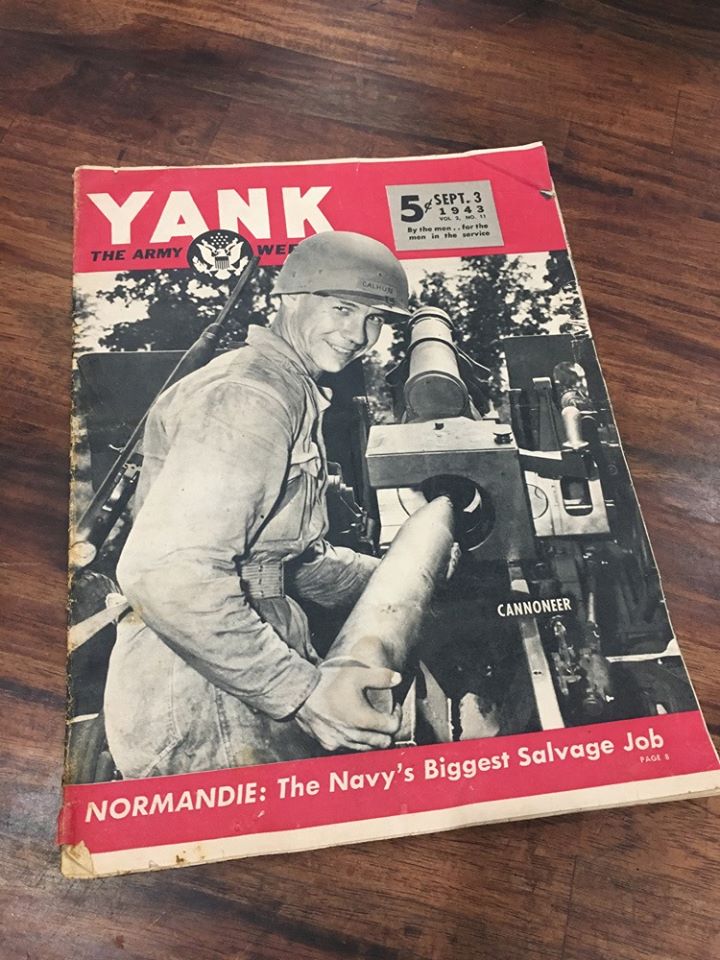
The issue of the US Army’s Yank magazine that was in print the week Lucky Thirteen was lost.
Photo taken 18 November 2019.
Since I am sure everyone wants to know…
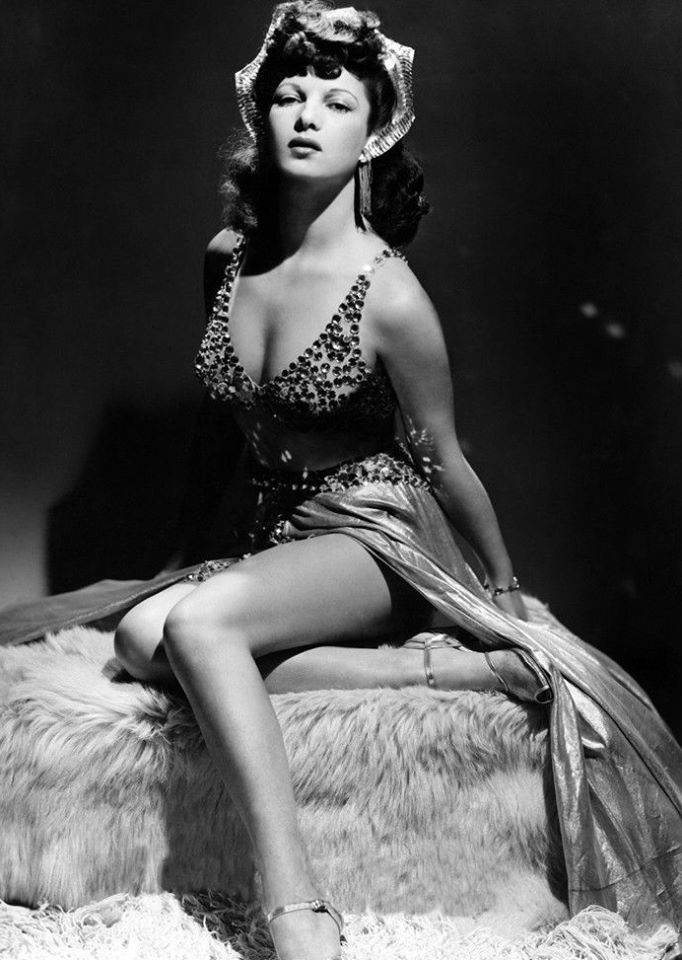
The pin-up of the week when Lucky Thirteen was lost was this image of Ann Corio.
She was a burlesque stripper who, like most, moved to Los Angeles after Fiorello La Guardia famously shut down New York’s burlesque clubs in 1939. She appeared in a few B movies like Swamp Woman, Jungle Siren, and Call of the Jungle – most of which are knock-offs of the jungle-seductress film White Cargo starring Hedy Lamarr.
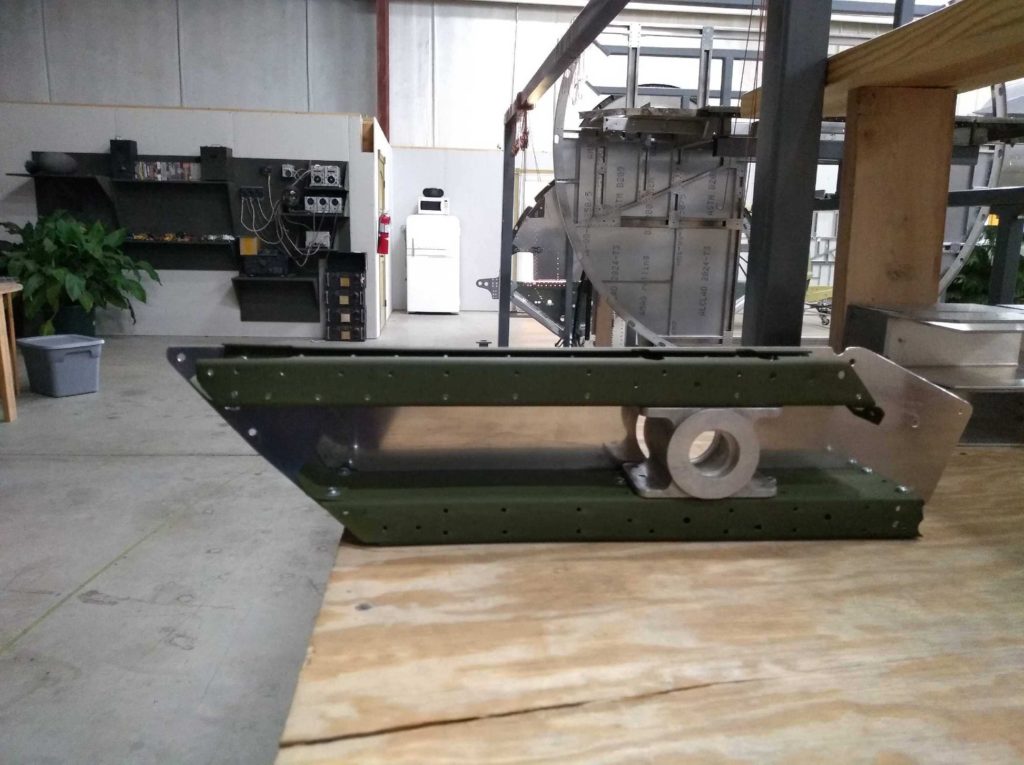
Working on the carry-through spars that go beneath the bomb bay, we have recently received a set of original attachment plates. This is a huge step forward. They are in very good shape and just need to be cleaned and gold cad-plated before being permanently installed.
Also are a few recently restored box pieces which feed the bomb bay door mechanisms. The longer ones go on Station 4 (cockpit back wall) and the shorter ones on Station 5 (radio front wall).
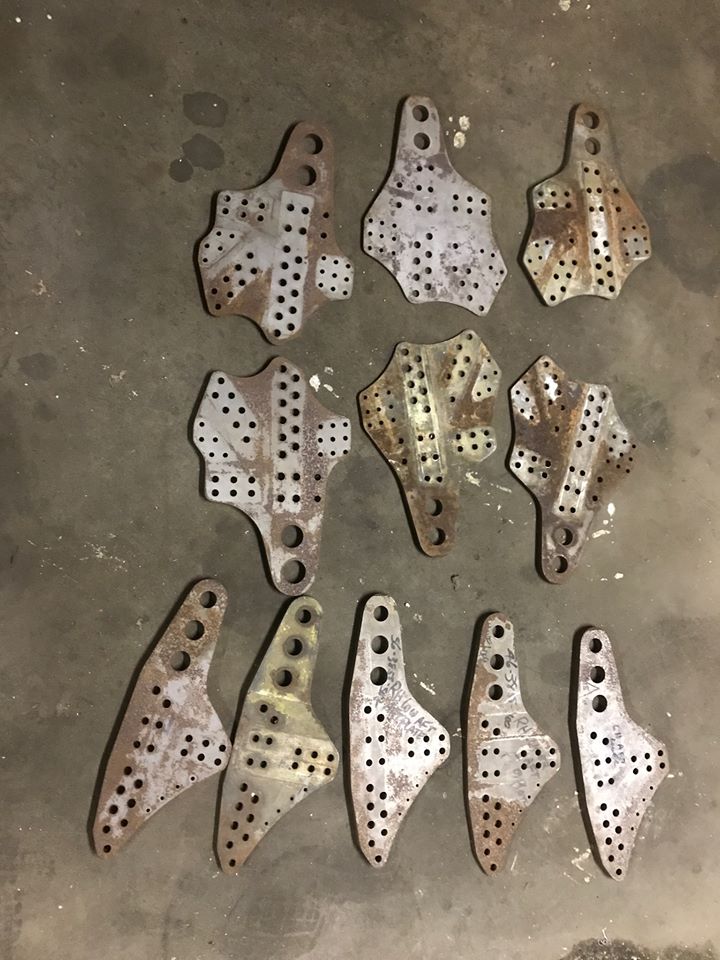
The newly acquired attachment plates for the carry through spars.
Photo taken 13 February 2020.
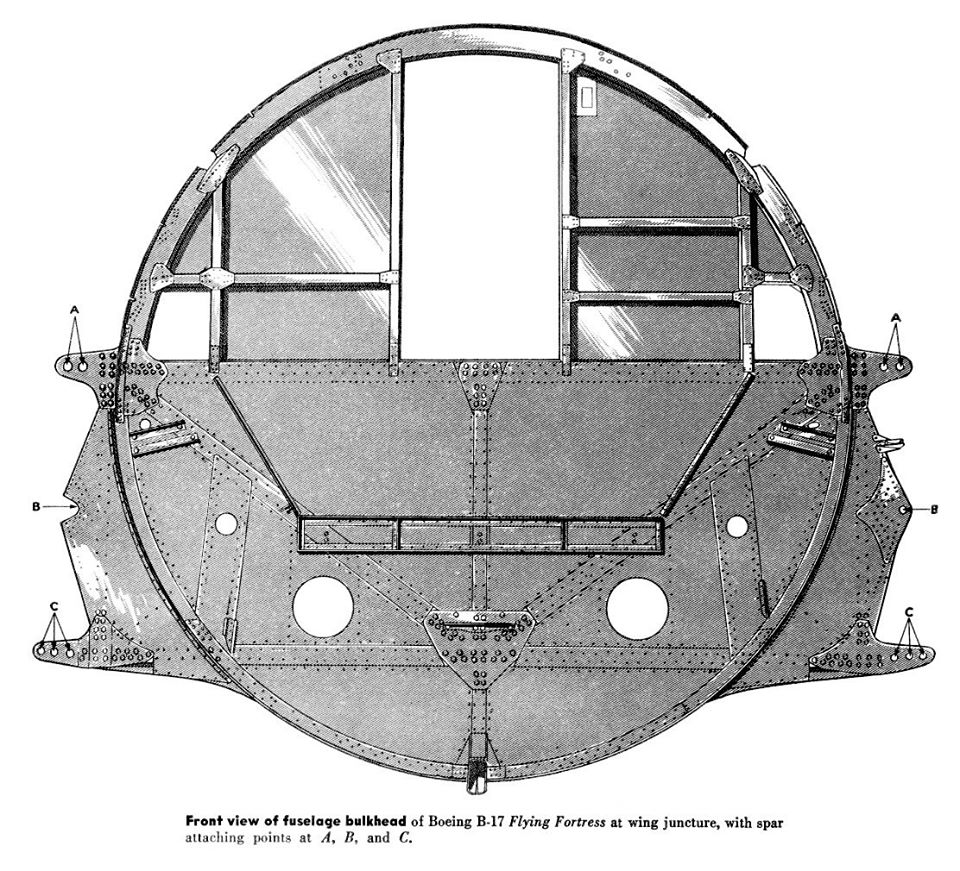
A manual illustration showing how the wingspar assembly connects to the bulkhead above. The attachment plates and door mechanisms are clearly visible here.
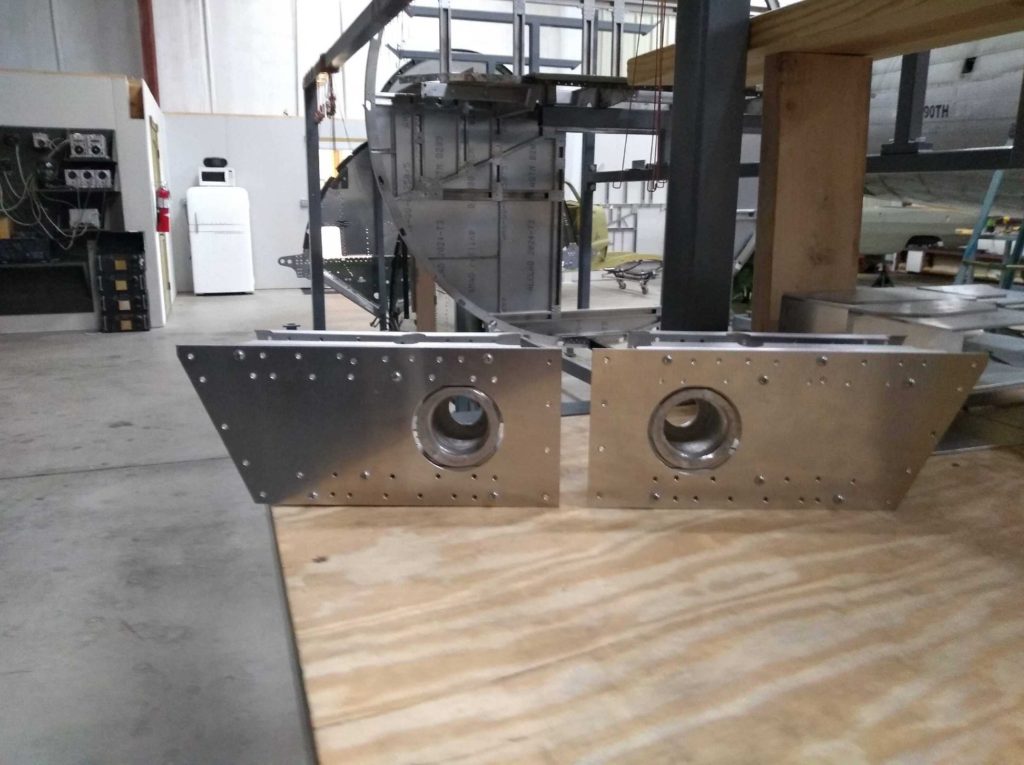
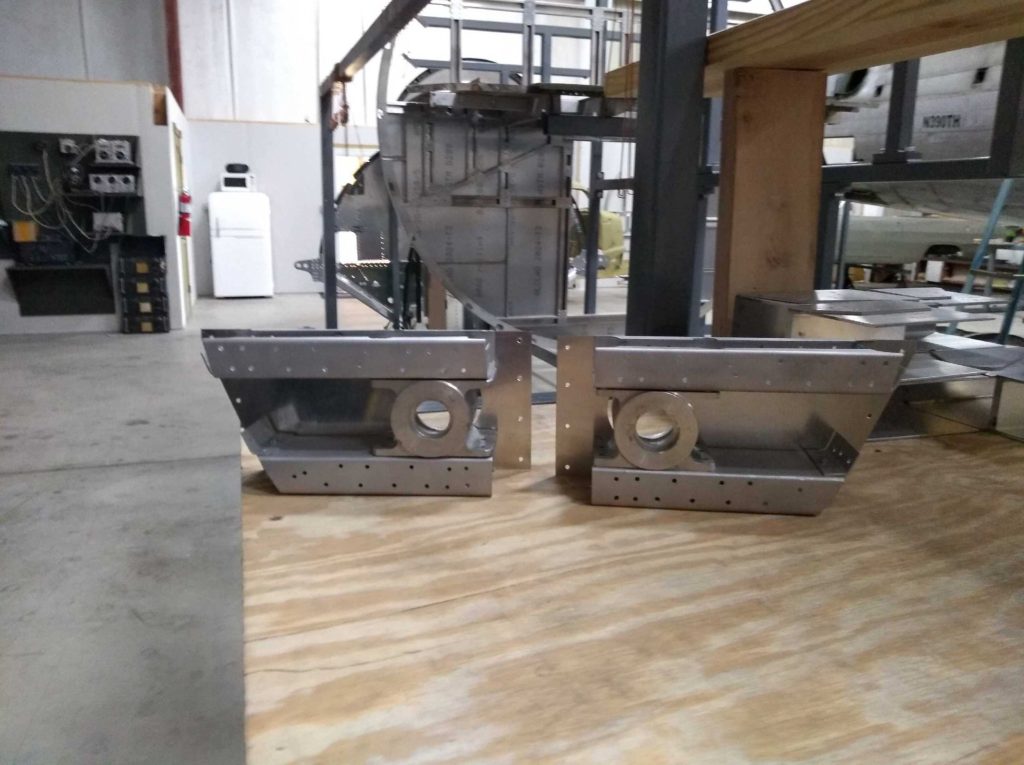
Boxes to Station 5 through which the bomb door mechanisms feed through.
These came from B-17G 44-83387, which was used as a movie prop for 20th Century Fox. This included being used in Twelve O’Clock High (1949) and Tora Tora Tora (1970).
Photo taken 9 February 2020.

One of the two boxes to Station 4 through which the bomb door mechanisms feed.
These came from B-17G 44-83316, which was used as a set piece for the “12 O’Clock High” television series (1964-1967).
Photo taken 9 February 2020.
My wife Megan (who is a graphic designer) and I recreated these labels back when we first started working with Ray. This batch was made for Dave from the B-17 Cockpit Project. He only needed a few, but the printshop required a minimum order. Typically, gold labels were on B-17s and yellow labels on B-29s, but we printed both just to be safe.
As you may recall, Cramer Chairs of St. Louis, Missouri produced a series of Posture Air-Flows for the Boeing B-17 and B-29. Today, it is far easier to locate B-29 examples than B-17 examples, the difference being that B-29 chairs were black and upholstered with canvas, while B-17 chairs were bronze green and upholstered with vinyl.
Speaking of Dave, a goody package from him just arrived in the mail, including the early-version AN5756 switch we needed for our Fluxgate Compass. There are some really cool and rare pieces in this package – thanks Dave!
Last is a Type A-7 Flare Container from Diane Penouilh of Marrero, Louisiana. We’ve been struggling to locate one of these for a while, using a Type A-6 we found as a backup. Our friend Neil Jones alerted us that their C-47 Night Fright needs an A-6, so he’s going to put together a goody package of his own in trade. To complete our flare equipment, we still need to find the Type A-2 Flare Gun Holder, which wraps around this bag.
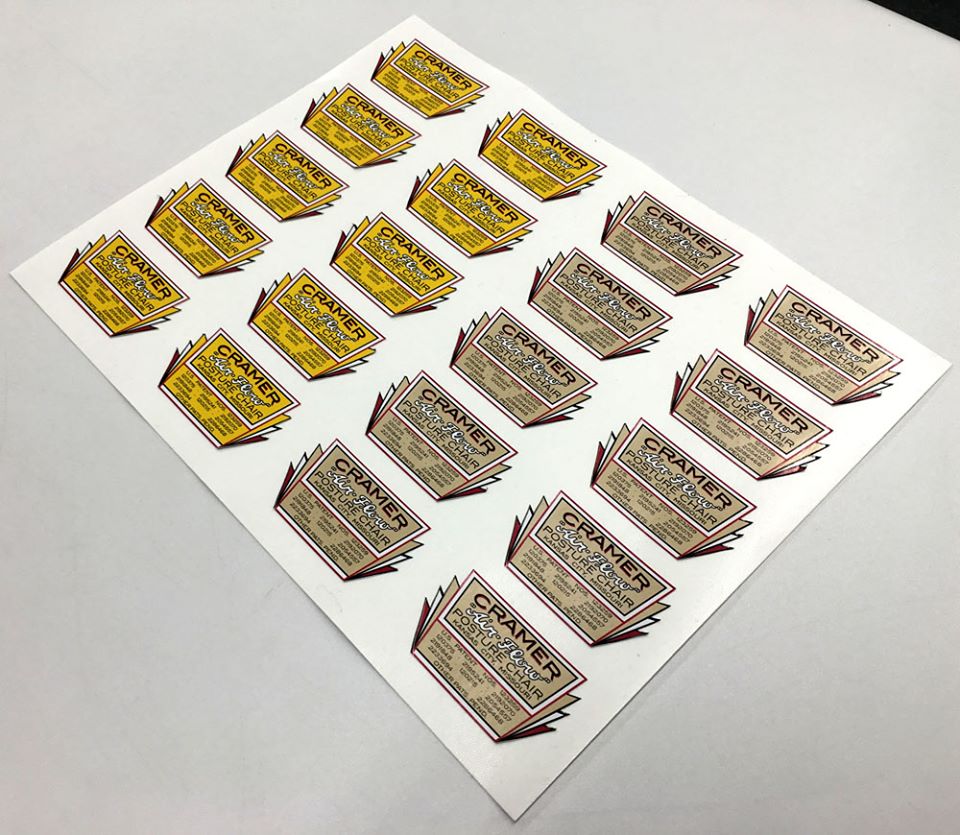
The replica B-29 and B-17 Cramer Posture Chair labels.
Recreating these took a lot more work than you might think. Our reference pictures were all of ripped up stickers, which meant we had to piece everything together. The patent numbers had to be verified by the Patent Office one by one. Having found them, I added them to our Library page in case anyone is interested.
Photo taken 6 February 2020.
The label is highlighted on the bombardier’s Cramer Posture Chair aboard Chatterbox II (42-102955, 351BG).
Photo taken 20 April 1944.
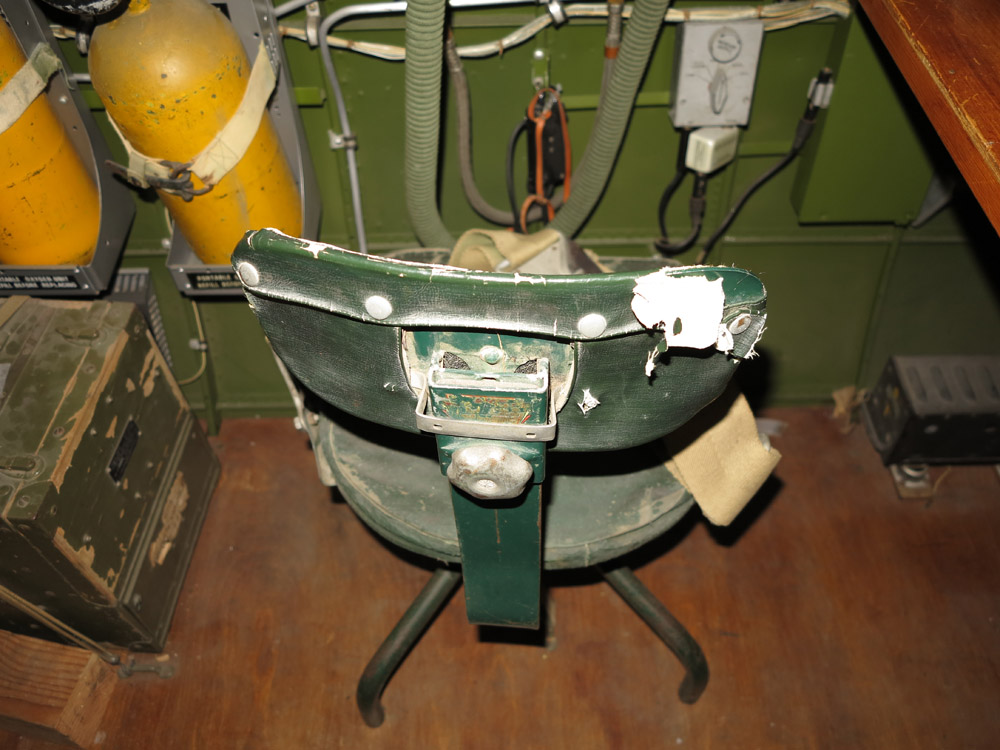
The untouched Cramer Posture Chair aboard Mary Alice (44-83735) at the American Air Museum (Imperial War Museum) in Duxford.
We have already recreated the seat bases and have matched the original material. We just need to machine new seat backs before we can create replica seat cushions. We have a seat back on loan, but there is never enough time and volunteers to get everything done we have on our “to do” list.
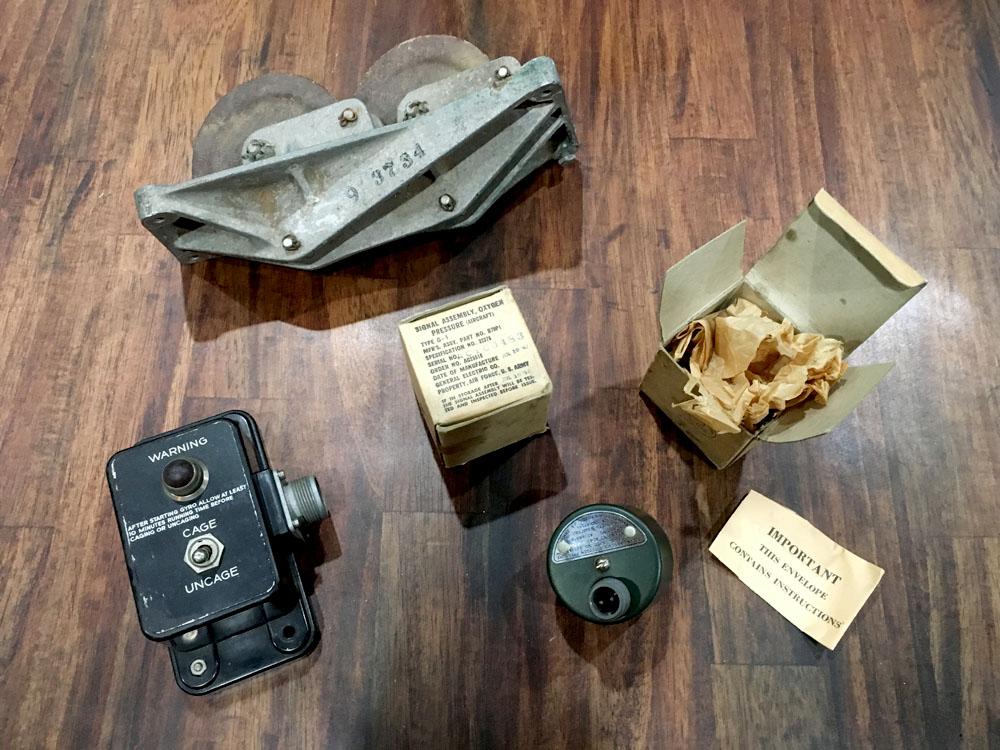
The contents of Dave’s goody package. Note the two NOS Oxygen Signal Assemblies.
Thanks Dave!
Photo taken 6 February 2020.
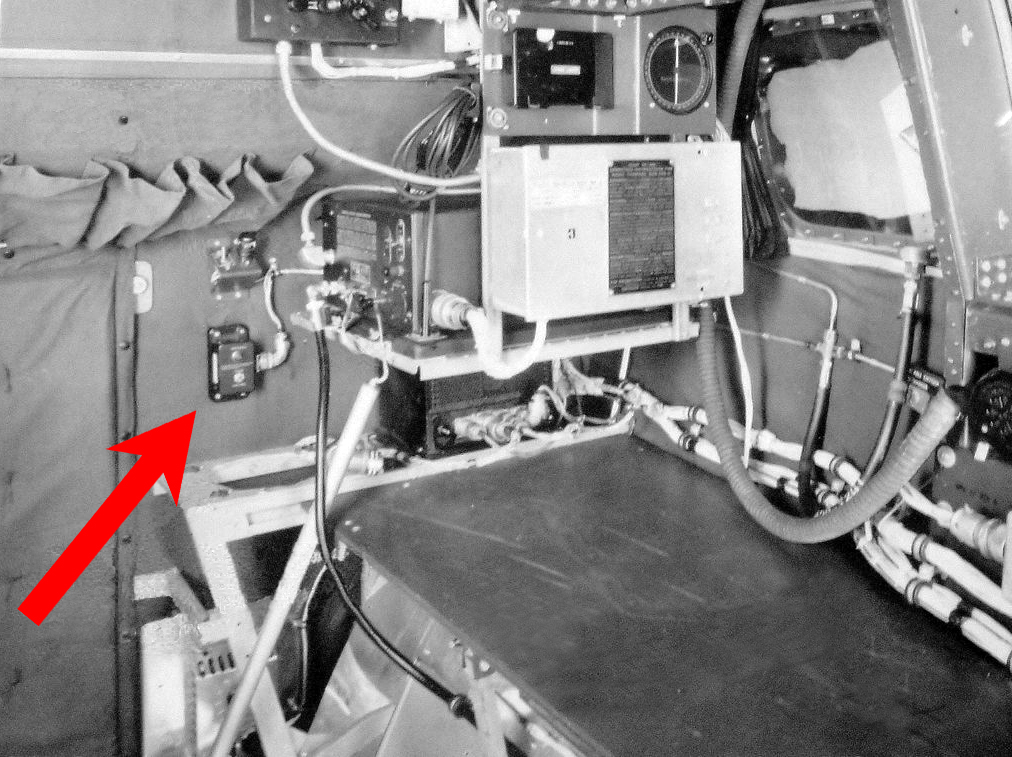
The early-style AN5756 switch is highlighted in this photo of an F-model’s navigator position.
Thanks to Dave, all that is left to complete Lucky Thirteen’s fluxgate compass is the AN5753 Amplifier. The amplifier is the black box mounted immediately to the table’s left, just under the BC-433 Radio Compass Unit.
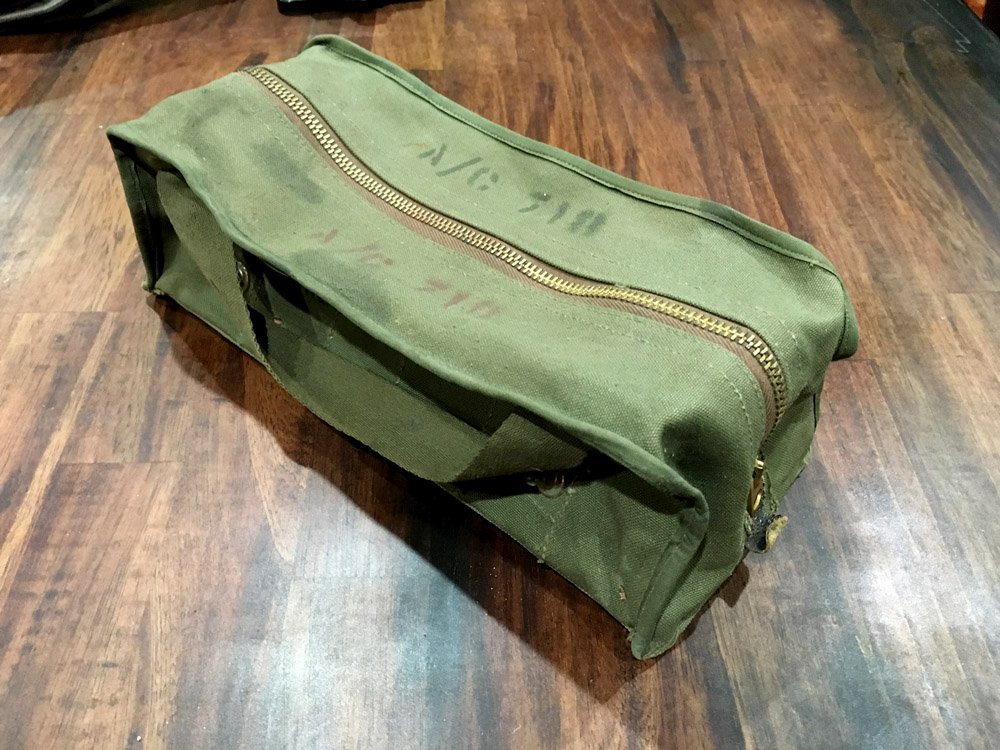
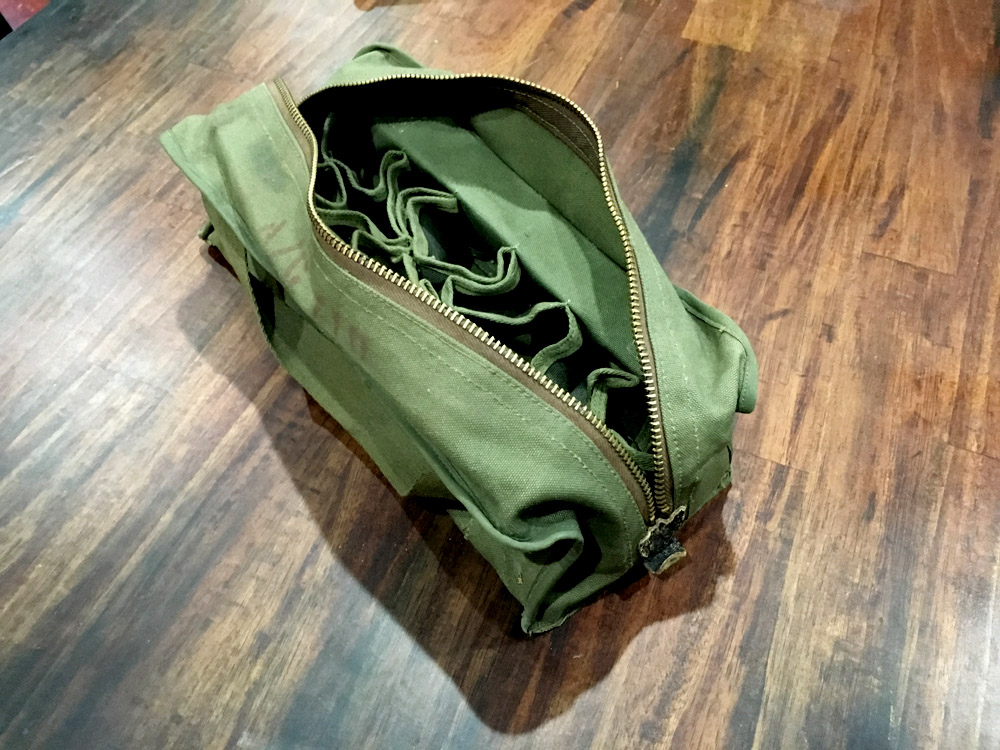
The newly-arrived Type A-7 Flare Container.
In all actuality, it is quite probable that this came off a B-17. There were only but a few large US aircraft with the numbers 718 on the tail.
The photo is more green than in person, as the container actually has a slight khaki tint.
We thought it would be neat to fill the container with spent flare cartridges (safer than unused ones). If any of you have a bunch sitting around, let us know. The A-7 held eighteen.
Photo taken 6 February 2020
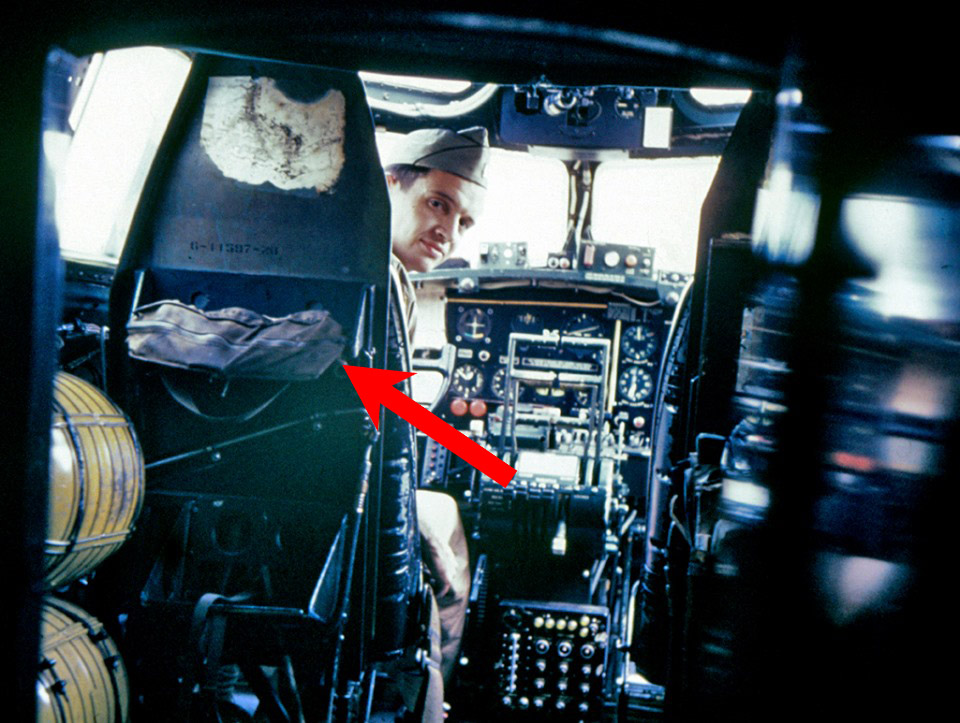
1LT Bob M. Welty of the 398BG peers over the armor plate on his seat. The A-7 flare container is highlighted.
Note the flare shelf on the back, which we recently recreated.
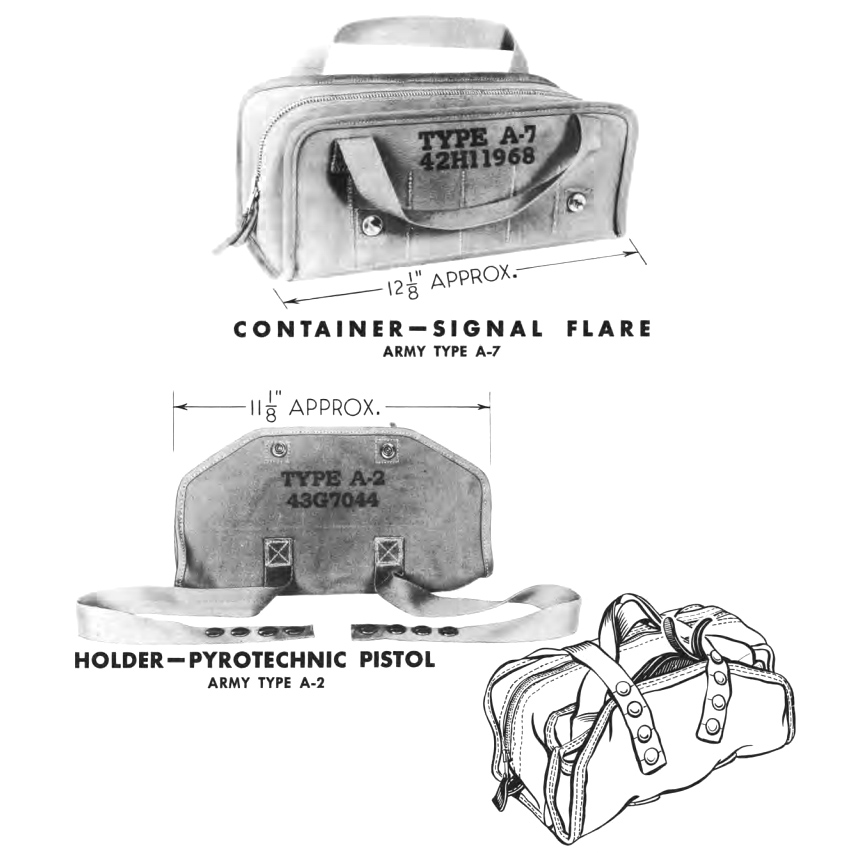
Manual photos of the A-7 Flare Container and A-2 Flare Gun Holder.
We have yet to locate an example of the A-2.
Last year Steve Salinas asked if I would help make a navigator’s table for Piccadilly Lilly II (44-83684) at the Planes of Fame Museum in Chino, California. The table commonly used on Gs featured an odd leg assembly and we had already made one before for Liberty Belle (44-85734).
Built too late to see combat, Piccadilly Lilly II was pulled from storage to serve as a drone mothership throughout the 1950s. Piccadilly Lilly II has two interesting claims to fame:
*She was the last B-17 struck from the Air Force register
and
*She guided the last active B-17 target drone when 44-83717 was shot down by an AIM-4 missile, fired by a McDonnell F-101, on 6 August 1959.
Hope you like your table, Steve.
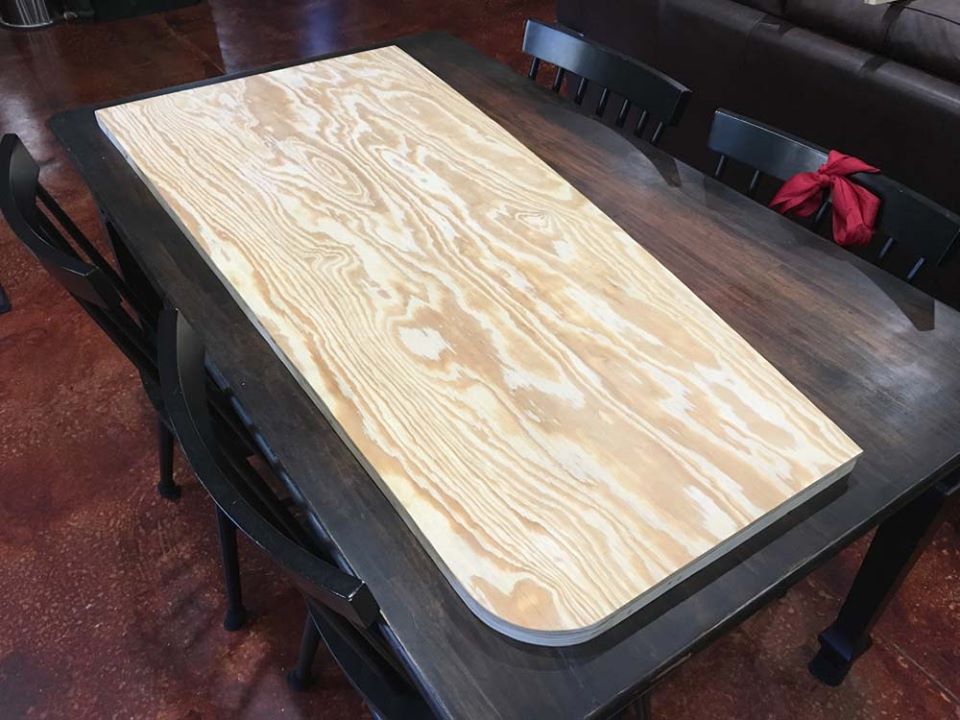
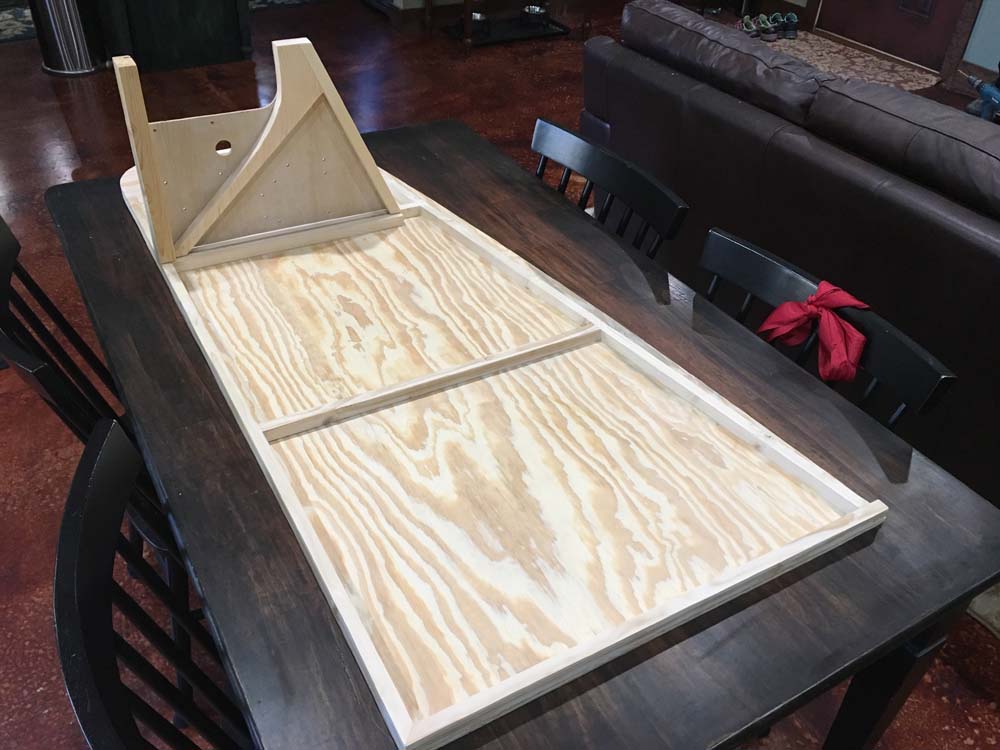
Navigator’s Table No. 15-13864 is laid out on my dinner table.
This style of table entered service with B-17G 42-97173 – roughly February 1944. As such, it is correct for all 38 surviving G-models except Shoo Shoo Baby (42-32076).
Unlike most wooden bits in the B-17, the blueprints called for the Navigator’s Table to be made of 3/8 5-ply poplar. Usually, the B-17 used Douglas Fir for its plywood.
The stringer pieces, as is typical, are made of spruce, and the rounded corner is reinforced with 3/4 plywood. Though not very visible, the joining edges of each large piece are further reinforced with maple pegs.
Photo taken 28 January 2020.
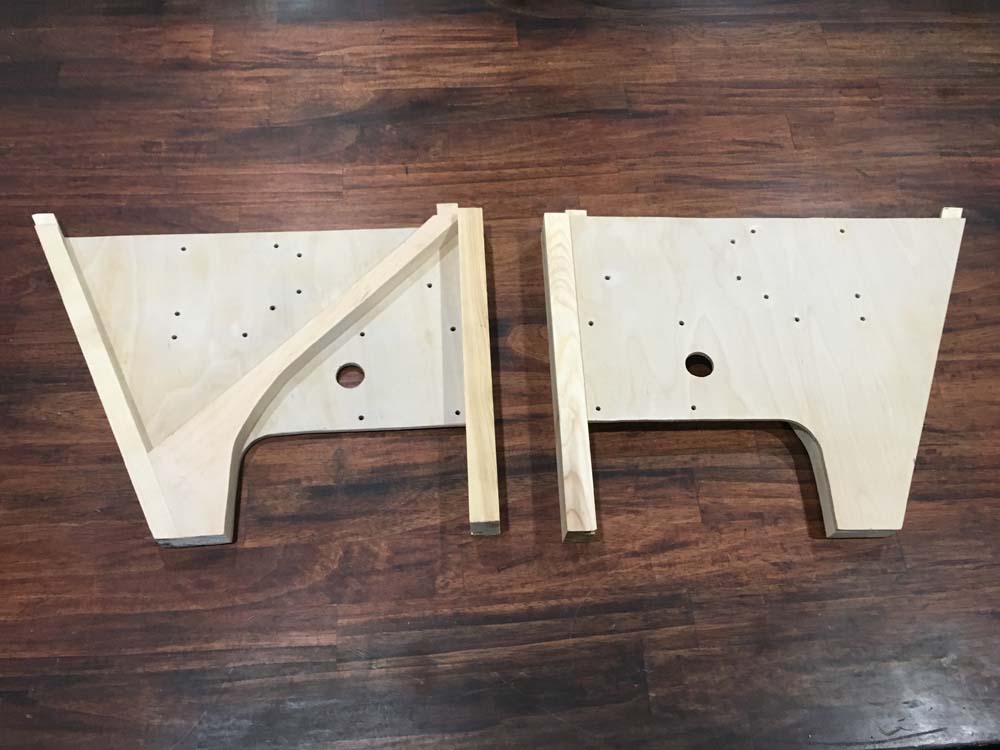
The unique leg assembly to Navigator’s Table No. 15-13864.
We made two just to be safe. We’ll send it on to Liberty Belle in case they decide to not use the reinforced one we originally built for them (they have a problem with visitors trying to sit on the desk).
The pre-drilled holes were used to hold various pieces that attached here, such as a spare bulbs box.
Photo taken 28 January 2020.

Reference photo from Chatterbox II (42-102955, 351BG), taken 20 April 1944.
Note the ALCLAD stamps on the unpainted walls.
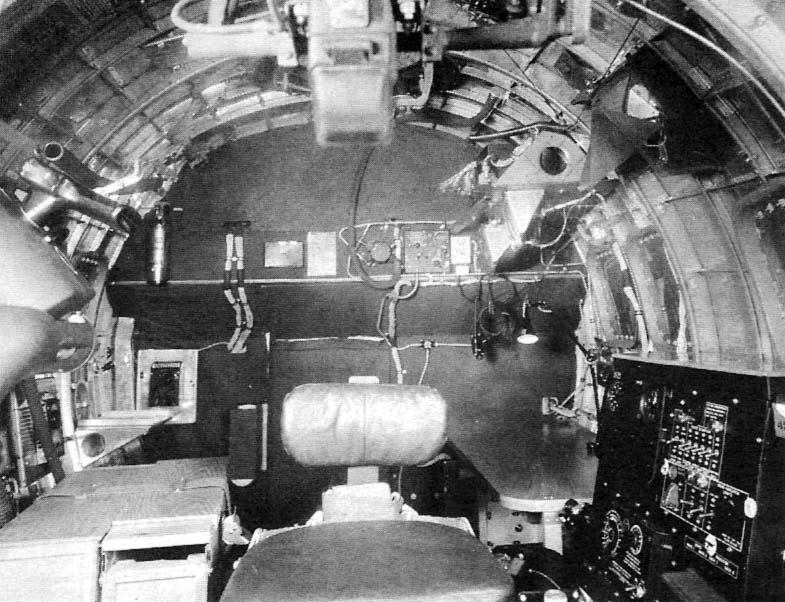
A manual photo showing Navigator’s Table No. 15-13864.
As a late-G, the navigator’s position on Piccadilly Lilly II would have been laid out like this. The GEE system dominates this area.
Also note how this aircraft is equipped with an ARN-7 radio compass instead of a SCR-269, as evidenced by the extra frequency bands on the control box on the wall.
I recently got an e-mail from Steve Killpack of Salt Lake City. He had an original BC-434 cover that looked to be unused and asked if we would be interested. We were!
You see, the BC-434 is part of the SCR-269 Radio Compass – the system which uses the big football-shaped antenna. It was a navigation system which allowed the airplane to follow the signal of whatever radio frequency it was tuned to. (We play only the biggest hits! Wooo!) Many restorations opt to use the ARN-7 system, which was a similar system that came out toward the end of 1945, because it is easier to find parts for.
Radio navigation systems usually had two control boxes: one for the pilots and one for the navigator. While we had a pair of BC-434 boxes, one was in considerably better shape than the other, visually. Steve’s donation allows us two nice-looking BC-434s without having to do any cosmetic restoration. Thanks, Steve!
In other news, Charlie has been working on the BC-348 Liaison Receiver that goes on the Radio Operator’s desk. These are actually fairly common on the collector’s market, but the problem is that they are almost always converted to 12 volt. Most WWII aircraft operated on 28 volts, using dynamotors to control the power to each system. Naturally, we had to convert our BC-348 back to wartime spec, which included its dynamotor hookup.
Last year Charlie was able to find the plug which connected the BC-348’s mount to its power assembly. Charlie was able to complete its wiring. The BC-348 is ready for display.
The Radio Drive is REALLY close to completion, the only missing components left are:
-AN5753 Amplifier (for Fluxgate Compass)
-2x BC-345 Switch Boxes (for Intercom)
-FL-5 Radio Filter (for Intercom)
-TU-6 Tuning Unit (for Liaison Radio)
-TU-8 Tuning Unit (for Liaison Radio)
-BG-109 Bag (for Gibson Girl)
-M-276 Parachute (for BG-110 bag)
-W-147/W-147 Spare Wire (for Gibson Girl)
That’s it!
Of course, when it is time to install everything in the airplane, we’ll need help raising funds for all the period-correct lacquered wire! But that’s for another time…
The BC-434 cover donated by Steve Killpack of Salt Lake City.
Photo taken 2 January 2020.

The newly-wired FT-154 Mount for the BC-348 Liaison Transmitter. The little box on the back of the mount is the piece which connects the radio to its power supply.
Some of you may recall how we struggled to locate that little box. Thankfully a friend was able to get us one. It was a huge relief after a ‘warbird parts’ dealer quoted a ridiculous 625 bucks.
Photo taken 13 January 2020.
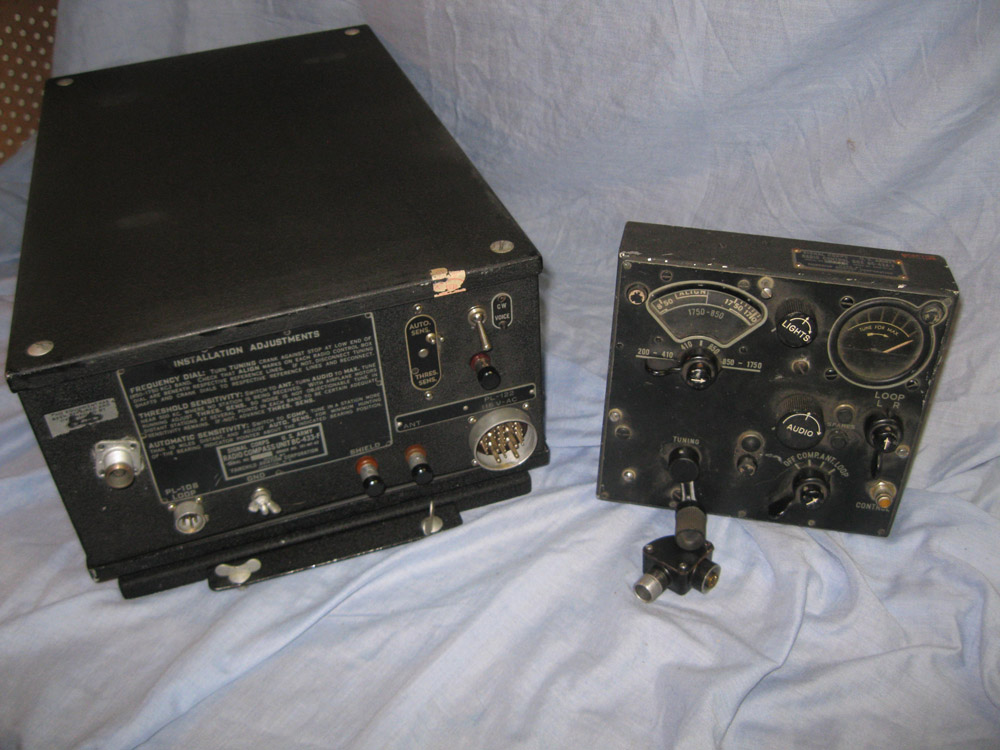
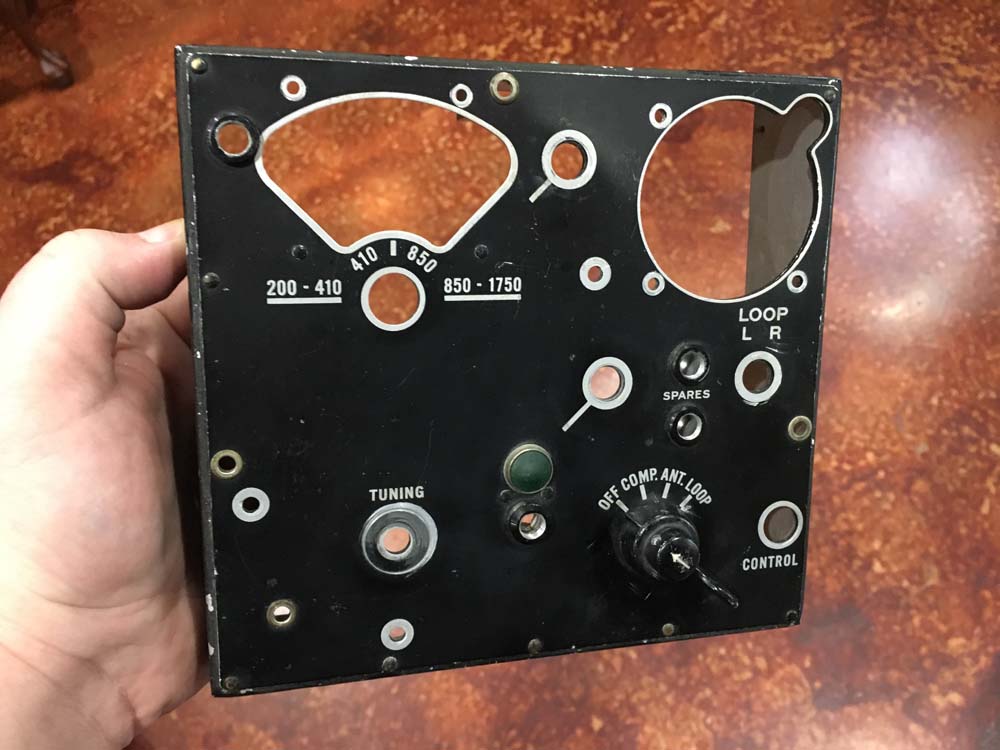
A photo from last year of two of the main Radio Compass components. The BC-434 control box on the right was the nicer of the two we have. Thanks to Steve’s contribution, they both look great now!
Some of you may recall that our NOS BC-433 (left) was dented by FedEx in shipping. Remember folks – whenever you pack something, put in more padding than you think is necessary!
Photo taken 4 January 2019.
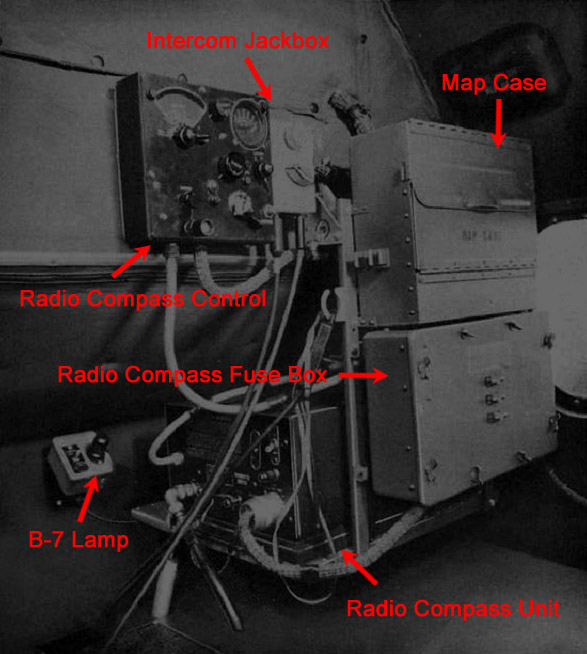
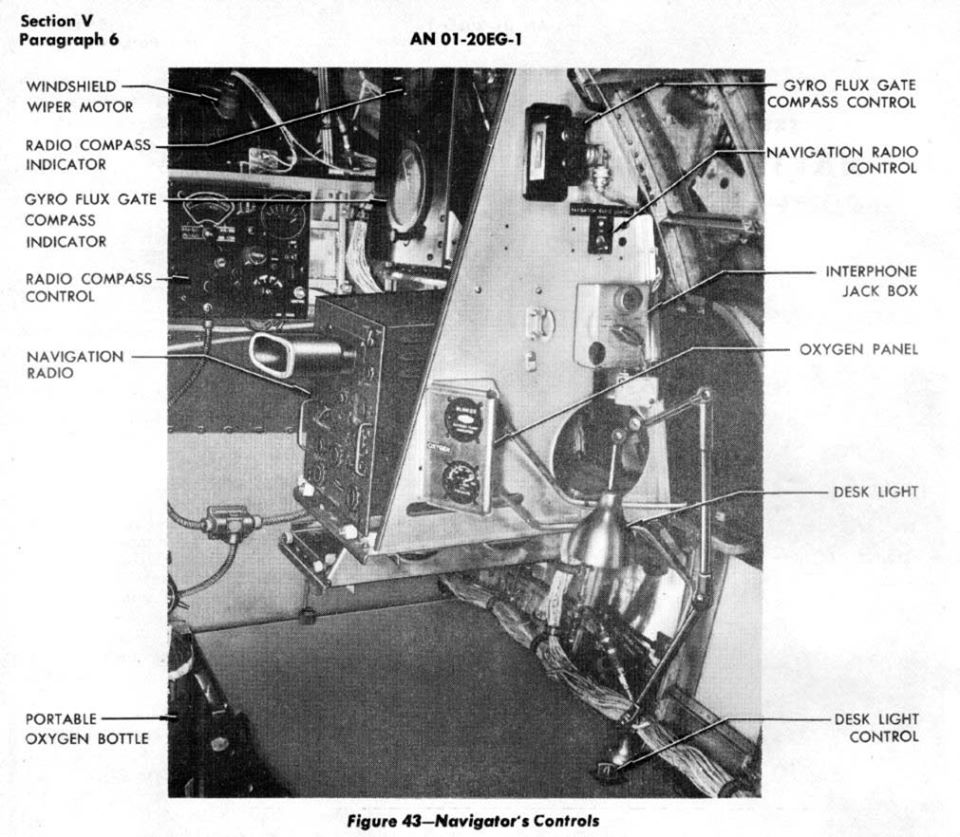
The equipment is annotated on Station 3 beside the navigator’s table.
The navigator’s BC-434 is highlighted as “Radio Compass Control.”
This position would change considerably in the G-series, and we highly recommend you follow Dave’s work at the B-17 Cockpit Project to see how its navigation equipment was laid out.
We have everything you see here except the lamp. If you would like to contribute any Type B-7 Extendable Lamps, please let us know!
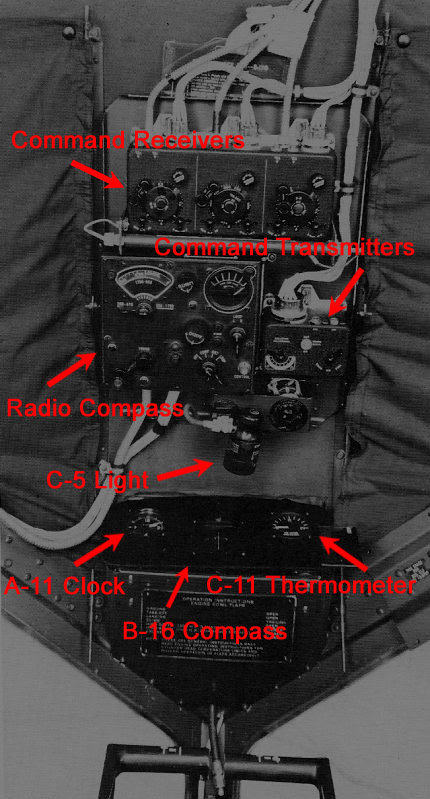
The equipment is annotated on the cockpit roof.
The pilots’ BC-434 is highlighted as “Radio Compass.”
The equipment is annotated on Station 5.
The BC-348 unit is highlighted as “Liaison Receiver.”
We already have one Type A-17 Extinguisher but still need two more. If you can help with this, please let us know!
We have been trying to help the National Museum of the US Air Force in the restorations of Memphis Belle and Swoose in every way we can – especially since Belle and Lucky Thirteen have many of the same needs.
On 9 January I sent off a package of pieces that will be installed in Swoose and Memphis Belle.
These include the Pilot’s Checklist (which several of you kindly helped decipher), the Handcrank Identification Plates, the Fuse Box Reference Chart, and the Cowl Flap Instructions Plate.
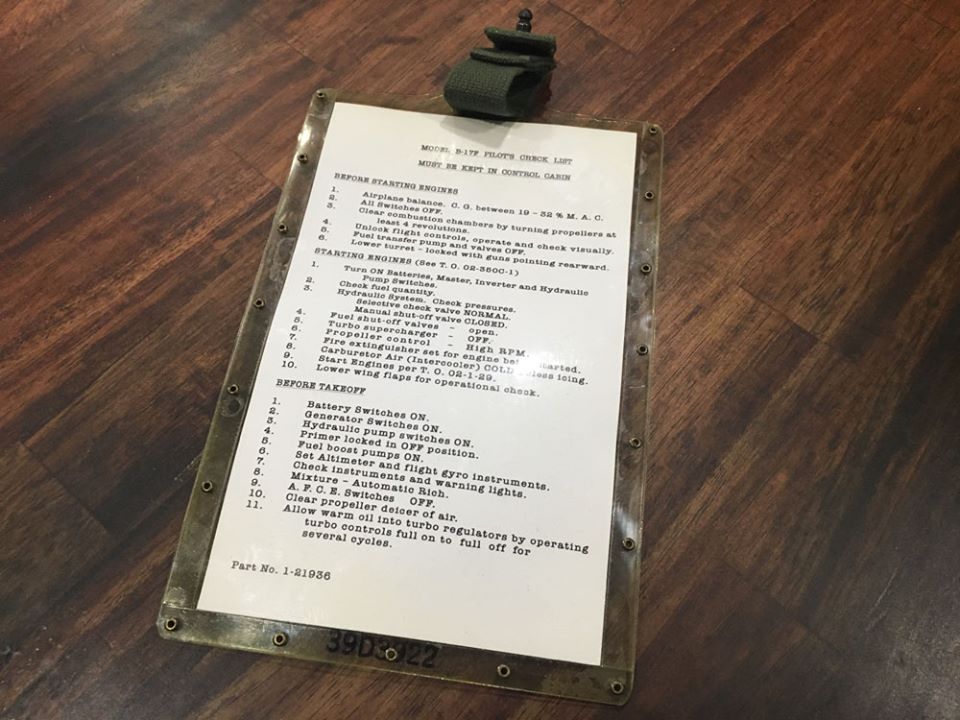
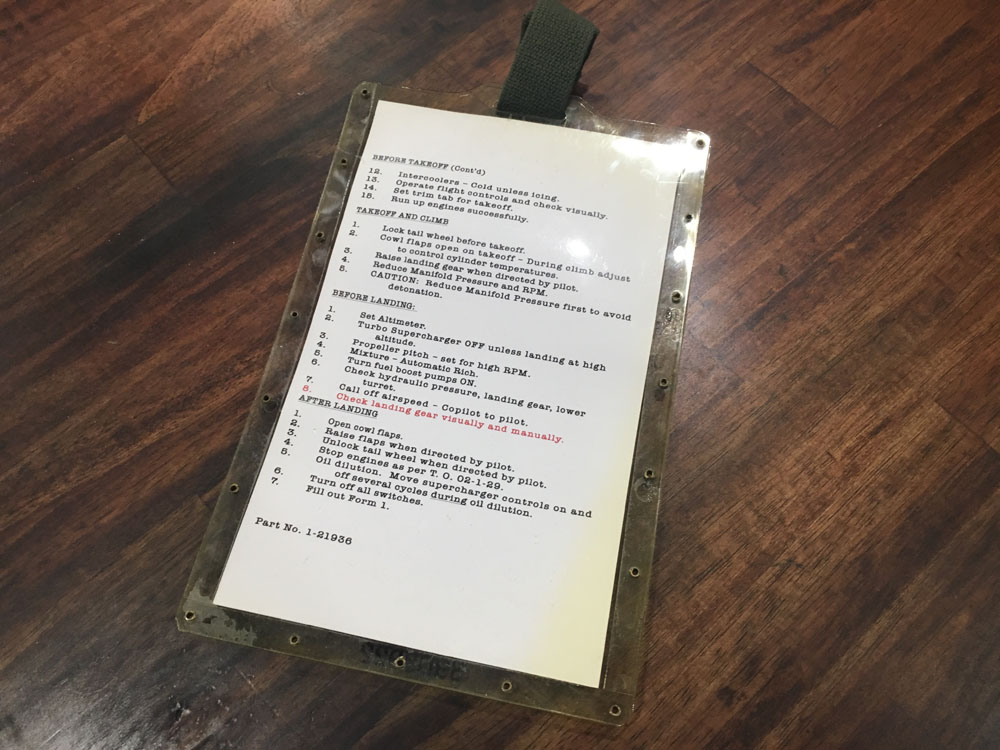
The Pilot’s Checklist for Lucky Thirteen. The checklist is kept in a GFE 39D3922 Checklist Holder. The holder is an original.
While this particular checklist is correct for Memphis Belle, we learned that it was not quite right for Lucky Thirteen. It turns out that Lucky Thirteen entered service shortly after the AAF began using fluorescent checklists. Since we have yet to find an F-model fluorescent checklist from 1943 to reference, we are going to use one akin to the one we provided Belle.
Photo taken 21 December 2019.
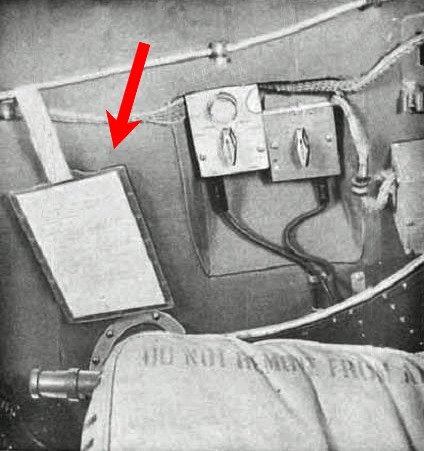
The Pilot’s Checklist is highlighted in this manual photo of the co-pilot’s position.
The Checklist is kept on a pair of straps to make it easy to clip anywhere the pilots might want to hang it.
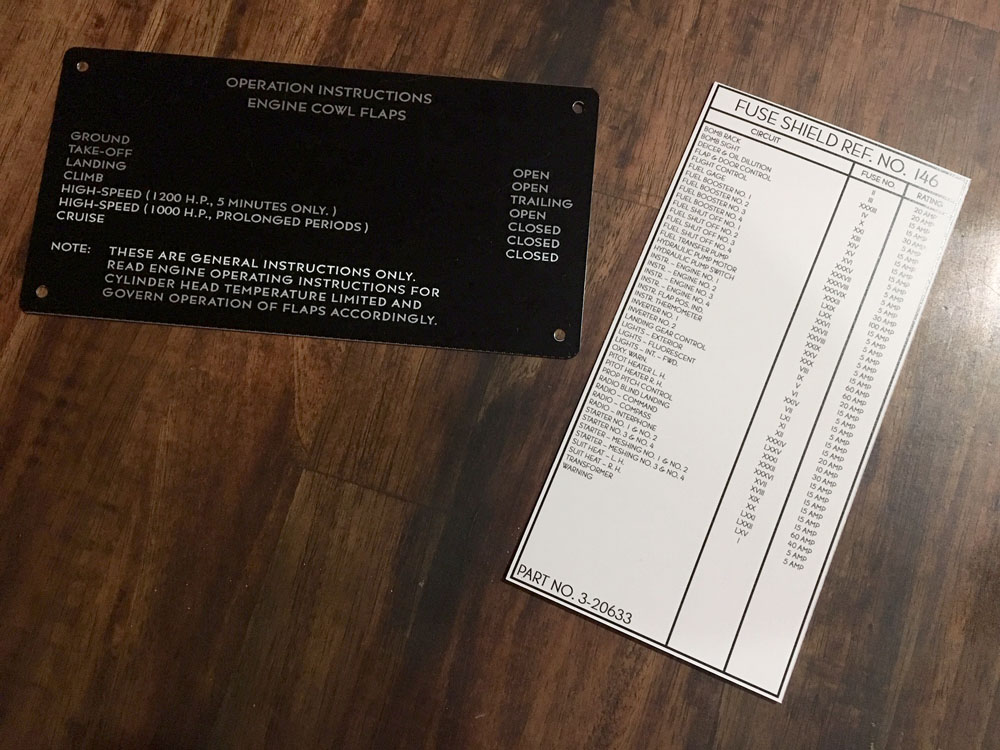
The Cowl Flap Instructions Plate and the Fuse Box Reference Chart for Lucky Thirteen.
A similar pair were sent to the NMUSAF for installation on Memphis Belle that were appropriate for her serial number.
Photo taken 9 January 2020
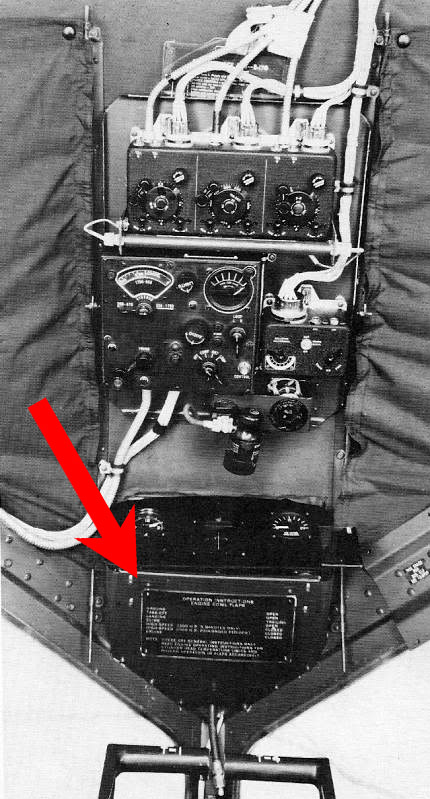
The Cowl Flaps Instructions Plate is highlighted in this manual photo of the cockpit roof.
Depending on the serial number, this plate could have been mounted virtually anywhere in the cockpit.
The panel it is mounted to is the Pilot’s Compass Panel. Chris recently found the Type B-16 Compass that goes here.
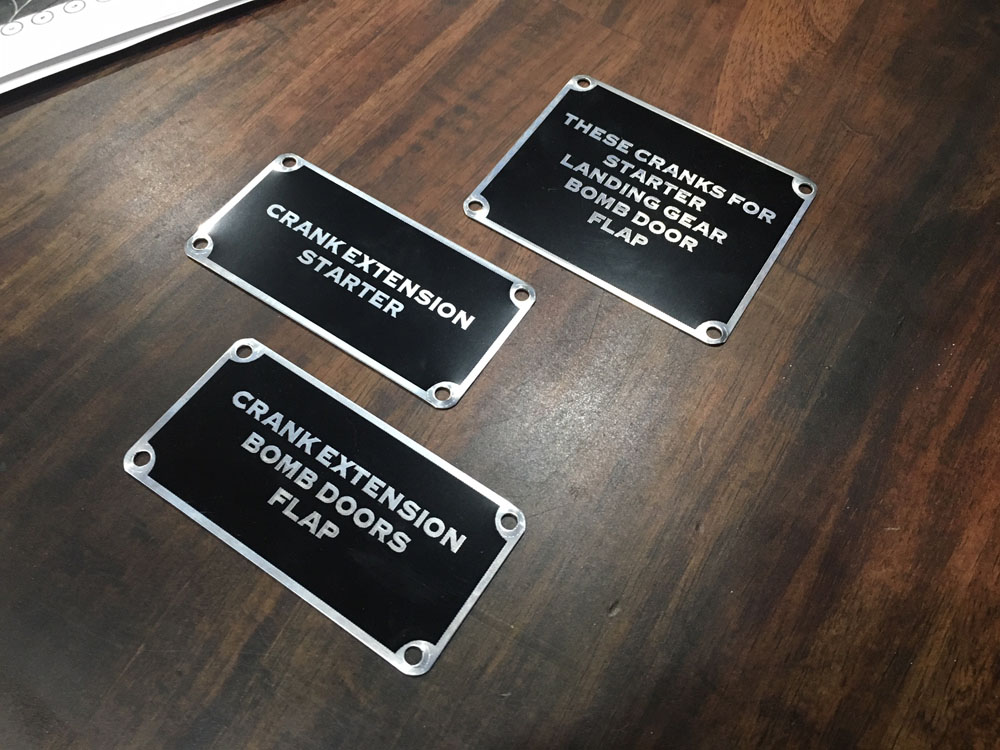
The Handcrank Identification Plates for Lucky Thirteen.
Photo taken 6 January 2020
The Handcrank Identification Plates are highlighted in this factory photo of a B-17E.
The B-17 carried a pair of Eclipse Machine D-12092 / AN4098 handcranks alongside a pair of extension fittings – one for the starter and one for the bomb doors and flaps.
On 14 December we took our first step toward another milestone for Lucky Thirteen – the instrument panel.
Arriving at Chris’s house was the B-17F’s Type B-16 Cockpit Compass. Combined with the AN5730-6 Remote Compass Slave Indicator and Type I-81-A Radio Compass Slave Indicator (the mains for both of which are by the Navigator’s position), these are the first gauges for the cockpit instrument panels.
For the last several months, I have been working to upload several new Parts Drives in preparation for the New Year, adding an Armament, Fabric, Instrument, and Oxygen page to the existing Auxiliary and Radio pages. Not all the blueprints have been uploaded to these drives, but all are fully annotated. Check them out here:
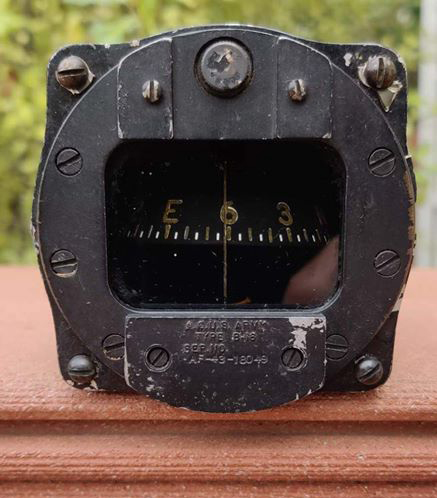
The newly-arrived Type B-16 Compass. This compass was mounted on the cockpit ceiling ahead of the SCR-274 Command Radio controls.
Photo taken 14 December 2019